Programmer’s manual
Build system
Yade uses cmake the cross-platform, open-source build system for managing the build process. It takes care of configuration, compilation and installation. CMake is used to control the software compilation process using simple platform and compiler independent configuration files. CMake generates native makefiles and workspaces that can be used in the compiler environment of your choice.
Building
The structure of Yade source tree is presented below.
We shall call each top-level component module (excluding, doc,
examples and scripts which don’t participate in the build process).
Some subdirectories of modules are skipped for brevity, see README.rst files therein for more information:
cMake/           ## cmake files used to detect compilation requirements
core/            ## core simulation building blocks
data/            ## data files used by yade, packaged separately
doc/             ## this documentation
examples/        ## examples directory
gui/             ## user interfaces
   qt5/             ## same, but for qt5
lib/             ## support libraries, not specific to simulations
preprocessing/   ## files associated with creation or generation of the simulation
   dem/             ## creating a DEM simulation
   potential/       ## creating a PotentialBlocks or PotentialParticles simulation
   README.rst       ## more information about this directory
pkg/             ## simulation-specific files
   common/          ## generally useful classes
   dem/             ## classes for Discrete Element Method
   README.rst       ## more information about this directory
postprocessing/  ## files associated with extracting results for postprocessing
   dem/             ## general data extraction from DEM, no particular data target
   image/           ## creating images from simulation
   vtk/             ## extracting data for VTK
   README.rst       ## more information about this directory
py/              ## python modules
scripts/         ## helper scripts including packaging and checks-and-tests
Header installation
CMAKE uses the original source layout and it is advised to use #include <module/Class.hpp>
style of inclusion rather than #include "Class.hpp" even if you are in the same directory.
The following table gives a few examples:
Original header location |
Included as |
|---|---|
|
|
|
|
|
|
|
|
Automatic compilation
In the pkg/ directory, situation is different. In order to maximally ease
addition of modules to yade, all *.cpp files are automatically scanned recursively by
CMAKE and considered for compilation.
To enable/disable some component use the cmake flags ENABLE_FEATURE, which are listed in:
When some component is enabled an extra #define flag YADE_FEATURE is passed from cmake to the compiler.
Then inside the code both the .cpp and .hpp files which contain the FEATURE feature
should have an #ifdef YADE_FEATURE guard at the beginning.
Linking
The order in which modules might depend on each other is given as follows:
module |
resulting shared library |
dependencies |
|---|---|---|
lib |
|
can depend on external libraries, may not depend on any other part of Yade. |
core |
|
|
pkg |
|
|
gui |
|
|
py |
(many files) |
|
Development tools
Integrated Development Environment and other tools
A frequently used IDE is Kdevelop. We recommend using this software for navigating in the sources, compiling and debugging. Other useful tools for debugging and profiling are Valgrind and KCachegrind. A series of wiki pages is dedicated to these tools in the development section of the wiki.
Yade is agnostic to the IDE used; it can be compiled and run directly from the command line. You can modify the source code using any text editor, such as vim https://www.vim.org/, emacs https://www.gnu.org/software/emacs/, vscode https://code.visualstudio.com/, or any other editor of your choice.
Hosting and versioning
The Yade project is kindly hosted at GitLab:
The versioning software used is GIT, for which a short tutorial can be found in Yade on GitLab. GIT is a distributed revision control system. It is available packaged for all major linux distributions.
The repository can be http-browsed.
Development process
Git is used for version control. The main development branch is called master and is hosted at GitLab.
For the development process, the following steps are recommended:
Clone the repository to your local machine:
git clone https://gitlab.com/yade-dev/trunk.gitCreate a new branch for your work:
git checkout -b my-new-featureMake your changes and commit them:
git commit -am 'Add some feature'Push to the branch:
git push origin my-new-featureSubmit a merge request on GitLab: Merge Request
The merge request will be reviewed by the developers and, if accepted, merged into the main branch. Yade has a wide range of pipelines that are automatically triggered by GitLab when a new commit is pushed to the repository. These pipelines include building the software, running tests, and generating the documentation. The results of these pipelines can be viewed on the GitLab CI/CD page or by clicking on the green checkmark next to a commit in the GitLab interface. If some tests fail, the developers will be notified and the merge request will not be accepted until the issues are resolved.
It is required to add at least one line into the ChangeLog file in the root directory of the repository for each merge request. This file is used to generate the release notes for each new version of Yade.
How to make a release
The release process is automated using GitLab CI/CD pipelines. The release process is triggered by creating a new tag in the repository.
The tag should be named according to the semver convention, (e.g., 2025.2.0), whre the first number is the
year, the second number is the month, and the third number is the patch version.
The release process will build the software, run tests, and generate the documentation.
Create RELEASE file in the root folder with the version number in it.
Update Changelog file, put the proper date and version number in the top of the file.
Create branch using the following command and format:
git checkout -b YYYY.M.0
Tag release “git tag -as YYYY.M.0 -m”YYYY.M.0”
Return to master branch and remove RELEASE file
Push master, new branch and tags to gitlab
Download tar.gz
Create asc-file (signature):
gpg --armor --sign --detach-sig tarball.tar.gz
RELEASE file should contain the version number in the following format:
YYYY.MM.0
where YYYY is the year and MM is the month of the release. For example, the release file for the February 2025 release should contain the following text:
2025.2.0
Build robot
A build robot hosted at UMS Gricad is tracking source code changes via gitlab pipeline mechanism. Each time a change in the source code is committed to the main development branch via GIT, or a Merge Request (MR) is submitted the “buildbot” downloads and compiles the new version, and then starts a series of tests.
If a compilation error has been introduced, it will be notified to the yade-dev mailing list and to the committer, thus helping to fix problems quickly. If the compilation is successful, the buildbot starts unit regression tests and “check tests” (see below) and report the results. If all tests are passed, a new version of the documentation is generated and uploaded to the website in html and pdf formats. As a consequence, those two links always point to the documentation (the one you are reading now) of the last successful build, and the delay between commits and documentation updates are very short (minutes). The buildbot activity and logs can be browsed online.
The output of each particular build is directly accessible by clicking the green “Passed” button, and then clicking “Browse” in the “Job Artifacts” on the right.
Debugging
For yade debugging two tools are available:
Use the debug build so that the stack trace provides complete information about potential crash. This can be achieved in two ways:
Compiling yade with cmake option
-DDEBUG=ON,Installing
yade-dbgsymdebian/ubuntu package (this option will be available after this task is completed).
Use Logging framework described below.
These tools can be used in conjunction with other software. A detailed discussion of these is on yade wiki. These tools include: kdevelop, valgrind, alleyoop, kcachegrind, ddd, gdb, kompare, kdiff3, meld.
Note
On some linux systems stack trace will not be shown and a message ptrace: Operation not permitted will appear instead. To enable stack trace issue command: sudo echo 0 > /proc/sys/kernel/yama/ptrace_scope. To disable stack trace issue command sudo echo 1 > /proc/sys/kernel/yama/ptrace_scope.
Hint
When debugging make sure there is enough free space in /tmp.
Logging
Yade uses boost::log library for flexible logging levels and per-class debugging.
See also description of log module.
A cmake compilation option -DENABLE_LOGGER=ON must be supplied during compilation [1].
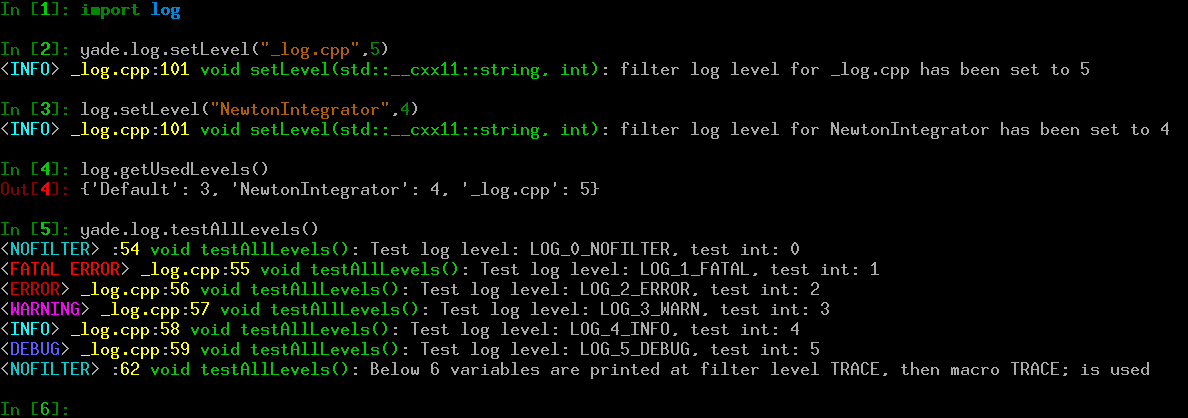
Figure imgLogging shows example use of logging framework. Usually a ClassName appears in place of _log.cpp shown on the screenshot. It is there because the yade.log module uses CREATE_CPP_LOCAL_LOGGER macro instead of the regular DECLARE_LOGGER and CREATE_LOGGER, which are discussed below.
Note
Default format of log message is:
<severity level> ClassName:LineNumber FunctionName: Log Message
special macro LOG_NOFILTER is printed without ClassName because it lacks one.
Config files can be saved and loaded via readConfigFile and saveConfigFile. The defaultConfigFileName is read upon startup if it exists. The filter level setting -f supplied from command line will override the setting in config file.
Log levels
Following debug levels are supported:
macro name |
filter name |
option |
explanation |
|---|---|---|---|
|
|
|
Will print only the unfiltered messages. The LOG_NOFILTER macro is for
developer use only, so basically |
|
|
|
Will print only critical errors. Even a throw to yade python interface will not recover from this situation. This is usually followed by yade exiting to shell. |
|
|
|
Will also print errors which do not require to throw to yade python interface. Calculations will continue, but very likely the results will be all wrong. |
|
|
|
Will also print warnings about recoverable problems that you should be notified about (e.g., invalid value in a configuration file, so yade fell back to the default value). |
|
|
|
Will also print all informational messages (e.g. something was loaded, something was called, etc.). |
|
|
|
Will also print debug messages. A yade developer puts them everywhere, and yade user enables them on per-class basis to provide some extra debug info. |
|
|
|
Trace messages, they capture every possible detail about yade behavior. |
Yade default log level is yade.log.WARN which is the same as invoking yade -f3.
Setting a filter level
Warning
The messages (such as a << b << " message.") given as arguments to LOG_* macros are used only if the message passes the filter level. Do not use such messages to perform mission critical calculations.
There are two settings for the filter level, the Default level used when no ClassName (or "filename.cpp") specific filter is set and a filter level set for specific ClassName (or "filename.cpp"). They can be set with following means:
When starting yade with
yade -fNcommand, whereNsets theDefaultfilter level. The default value isyade.log.WARN(3).To change
Defaultfilter level during runtime invoke commandlog.setLevel("Default",value)orlog.setDefaultLogLevel(value):
Yade [1]: import log

Yade [2]: log.setLevel("Default",log.WARN)

Yade [3]: log.setLevel("Default",3)

Yade [4]: log.setDefaultLogLevel(log.WARN)

Yade [5]: log.setDefaultLogLevel(3)
To change filter level for
SomeClassinvoke command:
Yade [6]: import log

Yade [7]: log.setLevel("NewtonIntegrator",log.TRACE)

Yade [8]: log.setLevel("NewtonIntegrator",6)
To change the filter level for
"filename.cpp"use the name specified when creating it. For example manipulating filter log level of"_log.cpp"might look like following:
Yade [9]: import log

Yade [10]: log.getUsedLevels()
Out[10]: {'Default': 3, 'NewtonIntegrator': 6}

Yade [11]: log.setLevel("_log.cpp",log.WARN)

Yade [12]: log.getUsedLevels()
Out[12]: {'Default': 3, 'NewtonIntegrator': 6, '_log.cpp': 3}

Yade [13]: log.getAllLevels()["_log.cpp"]
Out[13]: 3
Debug macros
To enable debugging for particular class the DECLARE_LOGGER; macro should be put in class definition inside header to create a separate named logger for that class. Then the CREATE_LOGGER(ClassName); macro must be used in the class implementation .cpp file to create the static variable. Sometimes a logger is necessary outside the class, such named logger can be created inside a .cpp file and by convention its name should correspond to the name of the file, use the macro CREATE_CPP_LOCAL_LOGGER("filename.cpp"); for this. On rare occasions logging is necessary inside .hpp file outside of a class (where the local class named logger is unavailable), then the solution is to use LOG_NOFILTER(…) macro, because it is the only one that can work without a named logger. If the need arises this solution can be improved, see Logging.cpp for details.
All debug macros (LOG_TRACE, LOG_DEBUG, LOG_INFO, LOG_WARN, LOG_ERROR, LOG_FATAL, LOG_NOFILTER) listed in section above accept the std::ostream syntax inside the brackets, such as LOG_TRACE( a << b << " text" ). The LOG_NOFILTER is special because it is always printed regardless of debug level, hence it should be used only in development branches.
Additionally seven macros for printing variables at LOG_TRACE level are available: TRVAR1, TRVAR2, TRVAR3, TRVAR4, TRVAR5, TRVAR6 and TRVARn. They print the variables, e.g.: TRVAR3(testInt,testStr,testReal); or TRVARn((testInt)(testStr)(testReal)). See function testAllLevels for example use.
The macro TRACE; prints a "Been here" message at TRACE log filter level, and can be used for quick debugging.
Utility debug macros
The LOG_TIMED_* family of macros:
In some situations it is useful to debug variables inside a very fast, or maybe a multithreaded, loop. In such situations it would be useful to:
Avoid spamming console with very fast printed messages and add some print timeout to them, preferably specified with units of seconds or milliseconds.
Make sure that each separate thread has opportunity to print message, without interleaving such messages with other threads.
To use above functionality one must #include <lib/base/LoggingUtils.hpp> in the .cpp file which provides the LOG_TIMED_* and TIMED_TRVAR* macro family. Example usage can be found in function testTimedLevels.
To satisfy the first requirement all LOG_TIMED_* macros accept two arguments, where the first argument is the wait timeout, using standard C++14 / C++20 time units, example use is LOG_TIMED_INFO( 2s , "test int: " << testInt++); to print every 2 seconds. But only seconds and milliseconds are accepted (this can be changed if necessary).
To satisfy the second requirement a thread_local static Timer variable is used. This way each thread in a parallel loop can print a message every 500ms or 10s e.g. in this parallel loop. The time of last print to console is stored independently for each thread and an extra code block which checks time is added. It means that a bit more checks are done than typical LOG_* which only perform an integer comparison to check filter level. Therefore suggested use is only during heavy debugging. When debugging is finished then better to remove them.
Note
The *_TRACE family of macros are removed by compiler during the release builds, because the default -DMAX_LOG_LEVEL is 5. So those are very safe to use, but to have them working locally make sure to compile yade with cmake -DMAX_LOG_LEVEL=6 option.
The LOG_ONCE_* family of macros:
In a similar manner a LOG_ONCE_* and ONCE_TRVAR* family of macros is provided inside file LoggingUtils.hpp. Then the message is printed only once.
All debug macros are summarized in the table below:
macro name |
explanation |
|---|---|
|
Declares logger variable inside class definition in |
|
Creates logger static variable (with name |
|
Creates logger static variable (with name |
|
Creates logger static variable outside of any class (with name |
LOG_TRACE, LOG_TIMED_TRACE, LOG_ONCE_TRACE,LOG_DEBUG, LOG_TIMED_DEBUG, LOG_ONCE_DEBUG,LOG_INFO, LOG_TIMED_INFO, LOG_ONCE_INFO,LOG_WARN, LOG_TIMED_WARN, LOG_ONCE_WARN,LOG_ERROR, LOG_TIMED_ERROR, LOG_ONCE_ERROR,LOG_FATAL, LOG_TIMED_FATAL, LOG_ONCE_FATAL,LOG_NOFILTER, LOG_TIMED_NOFILTER, LOG_ONCE_NOFILTER |
Prints message using
std::ostream syntax, like:LOG_TRACE( a << b << " text" )LOG_TIMED_TRACE( 5s , a << b << " text" ); , prints every 5 secondsLOG_TIMED_DEBUG( 500ms , a );, prints every 500 millisecondsLOG_ONCE_TRACE( a << b << " text" ); , prints just onceLOG_ONCE_DEBUG( a );, prints only once |
TRVAR1, TIMED_TRVAR1, ONCE_TRVAR1,TRVAR2, TIMED_TRVAR2, ONCE_TRVAR2,TRVAR3, TIMED_TRVAR3, ONCE_TRVAR3,TRVAR4, TIMED_TRVAR4, ONCE_TRVAR4,TRVAR5, TIMED_TRVAR5, ONCE_TRVAR5,TRVAR6, TIMED_TRVAR6, ONCE_TRVAR6,TRVARn, TIMED_TRVARn, ONCE_TRVARn |
Prints provided variables like:
TRVAR3(testInt,testStr,testReal);TRVARn((testInt)(testStr)(testReal));TIMED_TRVAR3( 10s , testInt , testStr , testReal);ONCE_TRVARn( (testInt)(testStr)(testReal));See file py/_log.cpp for example use.
|
|
Prints a |
LOG_TIMED_6, LOG_6_TRACE, LOG_ONCE_6,LOG_TIMED_5, LOG_5_DEBUG, LOG_ONCE_5,LOG_TIMED_4, LOG_4_INFO, LOG_ONCE_4,LOG_TIMED_3, LOG_3_WARN, LOG_ONCE_3,LOG_TIMED_2, LOG_2_ERROR, LOG_ONCE_2,LOG_TIMED_1, LOG_1_FATAL, LOG_ONCE_1,LOG_TIMED_0, LOG_0_NOFILTER, LOG_ONCE_0,LOG_TIMED_6_TRACE, LOG_6, LOG_ONCE_6_TRACE,LOG_TIMED_5_DEBUG, LOG_5, LOG_ONCE_5_DEBUG,LOG_TIMED_4_INFO, LOG_4, LOG_ONCE_4_INFO,LOG_TIMED_3_WARN, LOG_3, LOG_ONCE_3_WARN,LOG_TIMED_2_ERROR, LOG_2, LOG_ONCE_2_ERROR,LOG_TIMED_1_FATAL, LOG_1, LOG_ONCE_1_FATAL,LOG_TIMED_0_NOFILTER, LOG_0 LOG_ONCE_0_NOFILTER, |
Additional macro aliases for easier use in editors with tab completion. They have have a filter level number in their name. |
Maximum log level
Using boost::log for log filtering means that each call to LOG_* macro must perform a single integer comparison to determine if the message passes current filter level. For production use calculations should be as fast as possible and this filtering is not optimal, because the macros are not optimized out, as they can be re-enabled with a simple call to log.setLevel("Default",log.TRACE) or log.setLevel("Default",6). The remedy is to use the cmake compilation option MAX_LOG_LEVEL=4 (or 3) which will remove macros higher than the specified level during compilation. The code will run slightly faster and the command log.setLevel("Default",6) will only print a warning that such high log level (which can be checked with log.getMaxLevel() call) is impossible to obtain with current build.
Note
At the time when logging was introduced into yade the speed-up gain was so small, that it turned out to be impossible to measure with yade -f0 --stdperformance command. Hence this option MAX_LOG_LEVEL was introduced only on principle.
The upside of this approach is that yade can be compiled in a non-debug build, and the log filtering framework can be still used.
Regression tests
Yade contains two types of regression tests, some are unit tests while others are testing more complex simulations. Although both types can be considered regression tests, the usage is that we name the first simply “regression tests”, while the latest are called “check tests”. Both series of tests can be ran at yade startup by passing the options “test” or “checkall”
yade --test
yade --checkall
The yade --checkall is a complete check. To skip checks lasting more than 30 seconds one can use this command
yade --check
Unit regression tests
Unit regression tests are testing the output of individual functors and engines in well defined conditions. They are defined in the folder py/tests/. The purpose of unit testing is to make sure that the behaviour of the most important classes remains correct during code development. Since they test classes one by one, unit tests can’t detect problems coming from the interaction between different engines in a typical simulation. That is why check tests have been introduced.
To add a new test, the following steps must be performed:
Place a new file such as py/tests/dummyTest.py.
Add the file name such as
dummyTestto the py/tests/__init__.py file.If necessary modify the
importandallModuleslines in py/tests/__init__.py.According to instructions in python unittest documentation use commands such as
self.assertTrue(…),self.assertFalse(…)orself.assertRaises(…,…)to report possible errors.
Note
It is important that all variables used in the test are stored inside the class (using the self. accessor), and that all preparations are done inside the function setUp().
Check tests
Check tests (also see README) perform comparisons of simulation results between different versions of yade, as discussed here. They differ with regression tests in the sense that they simulate more complex situations and combinations of different engines, and usually don’t have a mathematical proof (though there is no restriction on the latest). They compare the values obtained in version N with values obtained in a previous version or any other “expected” results. The reference values must be hardcoded in the script itself or in data files provided with the script. Check tests are based on regular yade scripts, so that users can easily commit their own scripts to trunk in order to get some automatized testing after commits from other developers.
When check fails the script should return an error message via python command raise YadeCheckError(messageString) telling what went wrong. If the script itself fails for some reason and can’t generate an output, the log will contain only “scriptName failure”. If the script defines differences on obtained and awaited data, it should print some useful information about the problem. After this occurs, the automatic test will stop the execution with error message.
An example dummy check test scripts/checks-and-tests/checks/checkTestDummy.py demonstrates a minimal empty test. A little more functional example check test can be found in scripts/checks-and-tests/checks/checkTestTriax.py. It shows results comparison, output, and how to define the path to data files using checksPath.
Users are encouraged to add their own scripts into the scripts/checks-and-tests/checks/ folder. Discussion of some specific checktests design in questions and answers is welcome. Note that re-compiling is required before the newly added scripts can be launched by yade --check (or direct changes have to be performed in “lib” subfolders).
A check test should never need more than a few seconds to run. If your typical script needs more, try to reduce the number of elements or the number of steps.
To add a new check, the following steps must be performed:
Place a new file such as scripts/checks-and-tests/checks/checkTestDummy.py,
Inside the new script use
checksPathwhen it is necessary to load some data file, like scripts/checks-and-tests/checks/data/100spheresWhen error occurs raise exception with command
raise YadeCheckError(messageString)
It is recommended to run simulation for certain number of steps before checking the condition (O.run(Nsteps,wait = True)) rather than pausing simulation with O.pause(). The latter may cause segmentation fault during checks (related to execfile limitation described in the warning below).
Warning
Due to the limitation of execfile the local variables created in one check script are passed down to the check scripts executed after it. Hence creating a local variable in one script called e.g. Body will break the scripts executed after it, when they will try to create a new Body(). The workaround is to use unique non-trivial variable names in the check scripts.
GUI Tests
In order to add a new GUI test one needs to add a file to scripts/checks-and-tests/gui directory. File must be named according to the following convention:
testGuiName.py with an appropriate test Name in place (the testGui.sh script is searching
for files matching this pattern).
The scripts/checks-and-tests/gui/testGuiBilliard.py may serve as a boilerplate example. The important “extra” parts of the code (taken from e.g. example directory) are:
from testGuiHelper import TestGUIHelperscr = TestGUIHelper("Billiard"), make sure to put the chosen testNamein place ofBilliard.Establish a reasonable value of
guiIterPeriodwhich makes the test finish in less than 30 seconds.Inside
O.enginesthere has to be a call at the end of the loop toPyRunner(iterPeriod=guiIterPeriod, command='scr.screenshotEngine()').The last command in the script should be
O.run(guiIterPeriod * scr.getTestNum() + 1)to start the test process.Make sure to push to yade-data repository the reference screenshots (for dealing with
./datadir see Yade on GitLab). These screenshots can be also obtained from artifacts by clicking “Download” button in the gitlab pipeline, next to the “Browse” button in the right pane.
These tests can be run locally, after adjusting the paths at the start of testGui.sh script. Two modes of operation are possible:
Launch on the local desktop via command:
scripts/checks-and-tests/gui/testGui.sh, in this case the screenshots will be different from those used during the test.Or launch inside a virtual xserver via command:
xvfb-run -a -s "-screen 0 1600x1200x24" scripts/checks-and-tests/gui/testGui.sh, then the screenshots will be similar to those used in the test, but still there may be some differences in the font size. In such case it is recommended to use the reference screenshots downloaded from the artifacts in the gitlab pipeline (see point 6. above).
Care should be taken to not use random colors of bodies used in the test. Also no windows such as 3d View or Inspector view should be opened in the script testGuiName.py, because they are opened during the test by the TestGUIHelper class.
Note
It is not possible to call GUI tests from a call such as yade --test because of the necessity to launch YADE inside a virtual xserver.
Conventions
The following coding rules should be respected; documentation is treated separately.
general
C++ source files have
.hppand.cppextensions (for headers and implementation, respectively). In rare cases.ippis used for pure template code.All header files should have the
#pragma oncemultiple-inclusion guard.Do not type
using namespace …in header files, this can lead to obscure bugs due to namespace pollution.Avoid
using std::somethingin.hppfiles. Feel free to use them as much as you like inside.cppfiles. But remember that the usual problems with this practice still apply: wrong type or function might be used instead of the one that you would expect. But since it’s limited to a single.cppfile, it will be easier to debug and the convenience might outweight the associated dangers.Use tabs for indentation. While this is merely visual in
C++, it has semantic meaning in python; inadvertently mixing tabs and spaces can result in syntax errors.
capitalization style
Types should be always capitalized. Use CamelCase for composed class and typenames (
GlobalEngine). Underscores should be used only in special cases, such as functor names.Class data members and methods must not be capitalized, composed names should use lowercase camelCase (
glutSlices). The same applies for functions in python modules.Preprocessor macros are uppercase, separated by underscores; those that are used outside the core take (with exceptions) the form
YADE_*, such as YADE_CLASS_BASE_DOC_* macro family.
programming style
Be defensive, if it has no significant performance impact. Use assertions abundantly: they don’t affect performance (in the optimized build) and make spotting error conditions much easier.
Use
YADE_CASTandYADE_PTR_CASTwhere you want type-check during debug builds, but fast casting in optimized build.Initialize all class variables in the default constructor. This avoids bugs that may manifest randomly and are difficult to fix. Initializing with NaN’s will help you find otherwise unitialized variable. (This is taken care of by YADE_CLASS_BASE_DOC_* macro family macros for user classes)
Using clang-format
The file .clang-format contains the config which should produce always the same results. It works with clang-format --version >= 10. The aim is to eliminate commits that change formatting. The script scripts/clang-formatter.sh can be invoked on either file or a directory and will do the reformatting. Usually this can be integrated with the editor, see clang-format documentation (except that for vim py3f command has to be used), and in kdevelop it is added as a custom formatter.
The script scripts/python-formatter.sh applies our coding conventions to formatting of python scripts. It should be used before committing changes to python scripts.
For more help see:
Sometimes it is useful to disable formatting in a small section of the file. In order to do so, put the guards around this section:
In
C++use:// clang-format off …… // clang-format on
In
Pythonuse:# yapf: disable …… # yapf: enable
Class naming
Although for historical reasons the naming scheme is not completely consistent, these rules should be obeyed especially when adding a new class.
- GlobalEngines and PartialEngines
GlobalEngines should be named in a way suggesting that it is a performer of certain action (like ForceResetter, InsertionSortCollider, Recorder); if this is not appropriate, append the
Engineto the characteristics name (e.g. GravityEngine). PartialEngines have no special naming convention different from GlobalEngines.- Dispatchers
Names of all dispatchers end in
Dispatcher. The name is composed of type it creates or, in case it doesn’t create any objects, its main characteristics. Currently, the following dispatchers [2] are defined:
dispatcher
arity
dispatch types
created type
functor type
functor prefix
1
Bo12 (symetric)
2 × Shape
Ig22 (symetric)
2 × Material
Ip22 (asymetric)
(none)
Law2Respective abstract functors for each dispatchers are BoundFunctor, IGeomFunctor, IPhysFunctor and LawFunctor.
- Functors
Functor name is composed of 3 parts, separated by underscore.
prefix, composed of abbreviated functor type and arity (see table above)
Types entering the dispatcher logic (1 for unary and 2 for binary functors)
Return type for functors that create instances, simple characteristics for functors that don’t create instances.
To give a few examples:
Bo1_Sphere_Aabb is a BoundFunctor which is called for Sphere, creating an instance of Aabb.
Ig2_Facet_Sphere_ScGeom is binary functor called for Facet and Sphere, creating and instace of ScGeom.
Law2_ScGeom_CpmPhys_Cpm is binary functor (LawFunctor) called for types ScGeom (Geom) and CpmPhys.
Documentation
Documenting code properly is one of the most important aspects of sustained development.
Read it again.
Most code in research software like Yade is not only used, but also read, by developers or even by regular users. Therefore, when adding new class, always mention the following in the documentation:
purpose
details of the functionality, unless obvious (algorithms, internal logic)
limitations (by design, by implementation), bugs
bibliographical reference, if using non-trivial published algorithms (see below)
references to other related classes
hyperlinks to bugs, blueprints, wiki or mailing list about this particular feature.
As much as it is meaningful, you should also
update any other documentation affected
provide a simple python script demonstrating the new functionality in
scripts/test.
Sphinx documentation
Most c++ classes are wrapped in Python, which provides good introspection and interactive documentation (try writing Material? in the ipython prompt; or help(CpmState)).
Syntax of documentation is ReST (reStructuredText, see reStructuredText Primer). It is the same for c++ and python code.
Documentation of c++ classes exposed to python is given as 3rd argument to YADE_CLASS_BASE_DOC_* macro family introduced below.
Python classes/functions are documented using regular python docstrings. Besides explaining functionality, meaning and types of all arguments should also be documented. Short pieces of code might be very helpful. See the utils module for an example.
Note
Use C++ string literal when writing docstrings in C++. By convention the R"""(raw text)""" is used. For example see here and here.
Note
Remember that inside C++ docstrings it is possible to invoke python commands which are executed by yade when documentation is being compiled. For example compare this source docstring with the final effect.
In addition to standard ReST syntax, yade provides several shorthand macros:
:yref:creates hyperlink to referenced term, for instance:
:yref:`CpmMat`
becomes CpmMat; link name and target can be different:
:yref:`Material used in the CPM model<CpmMat>`
yielding Material used in the CPM model.
:ysrc:creates hyperlink to file within the source tree (to its latest version in the repository), for instance core/Cell.hpp. Just like with
:yref:, alternate text can be used with:ysrc:`Link text<target/file>`
like this. This cannot be used to link to a specified line number, since changing the file will cause the line numbers to become outdated. To link to a line number use
:ysrccommit:described below.:ysrccommit:creates hyperlink to file within the source tree at the specified commit hash. This allows to link to the line numbers using for example
#L121at the end of the link. Use it just like the:ysrc:except that commit hash must be provided at the beginning::ysrccommit:`Link text<commithash/target/file#Lnumber>` :ysrccommit:`default engines<775ae7436/py/__init__.py.in#L112>`
becomes default engines.
- Linking to
inheritanceGraph* To link to an inheritance graph of some base class a global anchor is created with name
inheritanceGraph*added in front of the class name, for example:ref:`Shape<inheritanceGraphShape>`yields link to inheritance graph of Shape.|ycomp|is used in attribute description for those that should not be provided by the user, but are auto-computed instead;
|ycomp|expands to (auto-computed).|yupdate|marks attributes that are periodically updated, being subset of the previous.
|yupdate|expands to (auto-updated).$...$delimits inline math expressions; they will be replaced by:
:math:`...`
and rendered via LaTeX. To write a single dollar sign, escape it with backslash
\$.Displayed mathematics (standalone equations) can be inserted as explained in Math support for HTML outputs in Sphinx.
As a reminder in the standard ReST syntax the references are:
:ref:is the the standard restructured text reference to an anchor placed elsewere in the text. For instance an anchor
.. _NumericalDamping:is placed in formulation.rst then it is linked to with:ref:`NumericalDamping`inside the source code... _anchor-name:is used to place anchors in the text, to be referenced from elsewhere in the text. Symbol
_is forbidden in the anchor name, because it has a special meaning:_anchorspecifies anchor, whileanchor_links to it, see below.anchor-name_is used to place a link to anchor within the same file. It is a shorter form compared to the one which works between different files:
:ref:. For example usage on anchorimgQtGuisee here and here.
Note
The command :scale: NN % (with percent) does not work well with .html + .pdf output, better to specify :width: NN cm. Then it is the same size in .html and .pdf.. For example see here which becomes this picture. But bear in mind that maximum picture width in .pdf is 16.2 cm.
Bibliographical references
As in any scientific documentation, references to publications are very important. To cite an article, first add it in BibTeX format to files doc/references.bib or doc/yade-*.bib depending whether that reference used Yade (the latter cases) or not (the former). Please adhere to the following conventions:
Keep entries in the form
Author2008(Authoris the first author),Author2008betc if multiple articles from one author;Try to fill mandatory fields for given type of citation;
Do not use
\'{i}funny escapes for accents, since they will not work with the HTML output; put everything in straight utf-8.
In your docstring, the Author2008 article can be then cited by [Author2008]_; for example:
According to [Allen1989]_, the integration scheme …
will be rendered as
According to [Allen1989], the integration scheme …
Separate class/function documentation
Some c++ might have long or content-rich documentation, which is rather inconvenient to type in the c++ source itself as string literals. Yade provides a way to write documentation separately in py/_extraDocs.py file: it is executed after loading c++ plugins and can set __doc__ attribute of any object directly, overwriting docstring from c++. In such (exceptional) cases:
Provide at least a brief description of the class in the c++ code nevertheless, for people only reading the code.
Add notice saying “This class is documented in detail in the py/_extraDocs.py file”.
Add documentation to py/_extraDocs.py in this way:
module.YourClass.__doc__='''
        This is the docstring for YourClass.

        Class, methods and functions can be documented this way.

        .. note:: It can use any syntax features you like.

'''
Note
Boost::python embeds function signatures in the docstring (before the one provided by the user). Therefore, before creating separate documentation of your function, have a look at its __doc__ attribute and copy the first line (and the blank line afterwards) in the separate docstring. The first line is then used to create the function signature (arguments and return value).
Internal c++ documentation
doxygen was used for automatic generation of c++ code. Since user-visible classes are defined with sphinx now, it is not meaningful to use doxygen to generate overall documentation. However, take care to document well internal parts of code using regular comments, including public and private data members.
Support framework
Besides the framework provided by the c++ standard library (including STL), boost and other dependencies, Yade provides its own specific services.
Pointers
Typecasting
Frequently, pointers have to be typecast; there is choice between static and dynamic casting.
dynamic_cast(dynamic_pointer_castfor ashared_ptr) assures cast admissibility by checking runtime type of its argument and returns NULL if the cast is invalid; such check obviously costs time. Invalid cast is easily caught by checking whether the pointer is NULL or not; even if such check (e.g.assert) is absent, dereferencing NULL pointer is easily spotted from the stacktrace (debugger output) after crash. Moreover,shared_ptrchecks that the pointer is non-NULL before dereferencing in debug build and aborts with “Assertion `px!=0’ failed.” if the check fails.static_castis fast but potentially dangerous (static_pointer_castforshared_ptr). Static cast will return non-NULL pointer even if types don’t allow the cast (such as casting fromState*toMaterial*); the consequence of such cast is interpreting garbage data as instance of the class cast to, leading very likely to invalid memory access (segmentation fault, “crash” for short).
To have both speed and safety, Yade provides 2 macros:
YADE_CASTexpands to
static_castin optimized builds and todynamic_castin debug builds.YADE_PTR_CASTexpands to
static_pointer_castin optimized builds and todynamic_pointer_castin debug builds.
Basic numerics
The floating point type to use in Yade is Real, which is by default typedef for double (64 bits, 15 decimal places). [4]
Yade uses the Eigen library for computations. It provides classes for 2d and 3d vectors, quaternions and 3x3 matrices templated by number type; their specialization for the Real type are typedef’ed with the “r” suffix, and occasionally useful integer types with the “i” suffix:
Vector2r,Vector2i
Vector3r,Vector3i
Quaternionr
Matrix3r
Yade additionally defines a class named Se3r, which contains spatial position (Vector3r Se3r::position) and orientation (Quaternionr Se3r::orientation), since they are frequently used one with another, and it is convenient to pass them as single parameter to functions.
Eigen provides full rich linear algebra functionality. Some code further uses the [cgal] library for computational geometry.
In Python, basic numeric types are wrapped and imported from the yade.minieigenHP module; the types drop the r type qualifier at the end, the syntax is otherwise similar. Se3r is not wrapped at all, only converted automatically, rarely as it is needed, from/to a (Vector3,Quaternion) tuple/list. See high precision section for more details.
# cross product
Yade [14]: Vector3(1,2,3).cross(Vector3(0,0,1))
Out[14]: Vector3(2,-1,0)

# construct quaternion from axis and angle
Yade [15]: Quaternion(Vector3(0,0,1),pi/2)
Out[15]: Quaternion((0,0,1),1.570796326794896558)
Note
Quaternions are internally stored as 4 numbers. Their usual human-readable representation is, however, (normalized) axis and angle of rotation around that axis, and it is also how they are input/output in Python. Raw internal values can be accessed using the [0] … [3] element access (or .W(), .X(), .Y() and .Z() methods), in both c++ and Python.
Run-time type identification (RTTI)
Since serialization and dispatchers need extended type and inheritance information, which is not sufficiently provided by standard RTTI. Each yade class is therefore derived from Factorable and it must use macro to override its virtual functions providing this extended RTTI:
YADE_CLASS_BASE_DOC(Foo,Bar Baz,"Docstring") creates the following virtual methods (mediated via the REGISTER_CLASS_AND_BASE macro, which is not user-visible and should not be used directly):
std::string getClassName()returning class name (Foo) as string. (There is thetypeid(instanceOrType).name()standard c++ construct, but the name returned is compiler-dependent.)unsigned getBaseClassNumber()returning number of base classes (in this case, 2).std::string getBaseClassName(unsigned i=0)returning name of i-th base class (here,Barfor i=0 andBazfor i=1).
Warning
RTTI relies on virtual functions; in order for virtual functions to work, at least one virtual method must be present in the implementation (.cpp) file. Otherwise, virtual method table (vtable) will not be generated for this class by the compiler, preventing virtual methods from functioning properly.
Some RTTI information can be accessed from python:
Yade [16]: yade.system.childClasses('Shape')
Out[16]:
{'Box',
 'ChainedCylinder',
 'Clump',
 'Cylinder',
 'DeformableCohesiveElement',
 'DeformableElement',
 'Facet',
 'FluidDomainBbox',
 'GridConnection',
 'GridNode',
 'LevelSet',
 'Lin4NodeTetra',
 'Lin4NodeTetra_Lin4NodeTetra_InteractionElement',
 'Node',
 'PFacet',
 'Polyhedra',
 'PotentialBlock',
 'PotentialParticle',
 'Sphere',
 'Subdomain',
 'Tetra',
 'Wall'}

Yade [17]: Sphere().__class__.__name__            ## getClassName()
Out[17]: 'Sphere'
Serialization
Serialization serves to save simulation to file and restore it later. This process has several necessary conditions:
classes know which attributes (data members) they have and what are their names (as strings);
creating class instances based solely on its name;
knowing what classes are defined inside a particular shared library (plugin).
This functionality is provided by 3 macros and 4 optional methods; details are provided below.
Serializable::preLoad,Serializable::preSave,Serializable::postLoad,Serializable::postSavePrepare attributes before serialization (saving) or deserialization (loading) or process them after serialization or deserialization.
YADE_CLASS_BASE_DOC_*Inside the class declaration (i.e. in the
.hppfile within theclass Foo { /* … */};block). See Attribute registration.Enumerate class attributes that should be saved and loaded; associate each attribute with its literal name, which can be used to retrieve it. See YADE_CLASS_BASE_DOC_* macro family.
Additionally documents the class in python, adds methods for attribute access from python, and documents each attribute.
REGISTER_SERIALIZABLEIn header file, but after the class declaration block. See Class factory.
Associate literal name of the class with functions that will create its new instance (
ClassFactory).Must be declared inside
namespace yade.YADE_PLUGINIn the implementation
.cppfile. See Plugin registration.Declare what classes are declared inside a particular plugin at time the plugin is being loaded (yade startup).
Must be declared inside
namespace yade.
Attribute registration
All (serializable) types in Yade are one of the following:
Type deriving from Serializable, which provide information on how to serialize themselves via overriding the
Serializable::registerAttributesmethod; it declares data members that should be serialzed along with their literal names, by which they are identified. This method then invokesregisterAttributesof its base class (untilSerializableitself is reached); in this way, derived classes properly serialize data of their base classes.This funcionality is hidden behind the macro YADE_CLASS_BASE_DOC_* macro family used in class declaration body (header file), which takes base class and list of attributes:
YADE_CLASS_BASE_DOC_ATTRS(ThisClass,BaseClass,"class documentation",((type1,attribute1,initValue1,,"Documentation for attribute 1"))((type2,attribute2,initValue2,,"Documentation for attribute 2")));
Note that attributes are encoded in double parentheses, not separated by commas. Empty attribute list can be given simply by
YADE_CLASS_BASE_DOC_ATTRS(ThisClass,BaseClass,"documentation",)(the last comma is mandatory), or by omitingATTRSfrom macro name and last parameter altogether.Fundamental type: strings, various number types, booleans,
Vector3rand others. Their “handlers” (serializers and deserializers) are defined inlib/serialization.Standard container of any serializable objects.
Shared pointer to serializable object.
Yade uses the excellent boost::serialization library internally for serialization of data.
Note
YADE_CLASS_BASE_DOC_ATTRS also generates code for attribute access from python; this will be discussed later. Since this macro serves both purposes, the consequence is that attributes that are serialized can always be accessed from python.
Yade also provides callback for before/after (de) serialization, virtual functions Serializable::preProcessAttributes and Serializable::postProcessAttributes, which receive one bool deserializing argument (true when deserializing, false when serializing). Their default implementation in Serializable doesn’t do anything, but their typical use is:
converting some non-serializable internal data structure of the class (such as multi-dimensional array, hash table, array of pointers) into a serializable one (pre-processing) and fill this non-serializable structure back after deserialization (post-processing); for instance, InteractionContainer uses these hooks to ask its concrete implementation to store its contents to a unified storage (
vector<shared_ptr<Interaction> >) before serialization and to restore from it after deserialization.precomputing non-serialized attributes from the serialized values; e.g. Facet computes its (local) edge normals and edge lengths from vertices’ coordinates.
Class factory
Each serializable class must use REGISTER_SERIALIZABLE, which defines function to create that class by ClassFactory. ClassFactory is able to instantiate a class given its name (as string), which is necessary for deserialization.
Although mostly used internally by the serialization framework, programmer can ask for a class instantiation using shared_ptr<Factorable> f=ClassFactory::instance().createShared("ClassName");, casting the returned shared_ptr<Factorable> to desired type afterwards. Serializable itself derives from Factorable, i.e. all serializable types are also factorable.
Note
Both macros REGISTER_SERIALIZABLE and YADE_PLUGIN have to be declared inside yade namespace.
Plugin registration
Yade loads dynamic libraries containing all its functionality at startup. ClassFactory must be taught about classes each particular file provides. YADE_PLUGIN serves this purpose and, contrary to YADE_CLASS_BASE_DOC_* macro family, must be placed in the implementation (.cpp) file, inside yade namespace. It simply enumerates classes that are provided by this file:
YADE_PLUGIN((ClassFoo)(ClassBar));
Note
You must use parentheses around the class name even if there is only one class (preprocessor limitation): YADE_PLUGIN((classFoo));. If there is no class in this file, do not use this macro at all.
Internally, this macro creates function registerThisPluginClasses_ declared specially as __attribute__((constructor)) (see GCC Function Attributes); this attributes makes the function being executed when the plugin is loaded via dlopen from ClassFactory::load(...). It registers all factorable classes from that file in the Class factory.
Note
Classes that do not derive from Factorable, such as Shop or SpherePack, are not declared with YADE_PLUGIN.
This is an example of a serializable class header:
namespace yade {
/*! Homogeneous gravity field; applies gravity×mass force on all bodies. */
class GravityEngine: public GlobalEngine{
        public:
                virtual void action();
        // registering class and its base for the RTTI system
        YADE_CLASS_BASE_DOC_ATTRS(GravityEngine,GlobalEngine,
                // documentation visible from python and generated reference documentation
                "Homogeneous gravity field; applies gravity×mass force on all bodies.",
                // enumerating attributes here, include documentation
                ((Vector3r,gravity,Vector3r::Zero(),"acceleration, zero by default [kgms⁻²]"))
        );
};
// registration function for ClassFactory
REGISTER_SERIALIZABLE(GravityEngine);
} // namespace yade
and this is the implementation:
#include <pkg/common/GravityEngine.hpp>
#include <core/Scene.hpp>

namespace yade {
// registering the plugin
YADE_PLUGIN((GravityEngine));

void GravityEngine::action(){
        /* do the work here */
}
} // namespace yade
We can create a mini-simulation (with only one GravityEngine):
Yade [18]: O.engines=[GravityEngine(gravity=Vector3(0,0,-9.81))]

Yade [19]: O.save('abc.xml')
and the XML save looks like this:
<?xml version="1.0" encoding="UTF-8" standalone="yes" ?>
<!DOCTYPE boost_serialization>
<boost_serialization signature="serialization::archive" version="19">
<scene class_id="0" tracking_level="0" version="1">
	<px class_id="1" tracking_level="1" version="0" object_id="_0">
		<Serializable class_id="2" tracking_level="1" version="0" object_id="_1"></Serializable>
		<dt>1.00000000000000002e-08</dt>
		<iter>0</iter>
		<subStepping>0</subStepping>
		<subStep>-1</subStep>
		<time>0.00000000000000000e+00</time>
		<speed>0.00000000000000000e+00</speed>
		<stopAtIter>0</stopAtIter>
		<stopAtTime>0.00000000000000000e+00</stopAtTime>
		<isPeriodic>0</isPeriodic>
		<trackEnergy>0</trackEnergy>
		<doSort>0</doSort>
		<runInternalConsistencyChecks>1</runInternalConsistencyChecks>
		<selectedBody>-1</selectedBody>
		<subdomain>0</subdomain>
		<subD class_id="3" tracking_level="0" version="1">
			<px class_id="4" tracking_level="1" version="0" object_id="_2">
				<Serializable object_id="_3"></Serializable>
				<color class_id="5" tracking_level="0" version="0">
					<x>1.00000000000000000e+00</x>
					<y>1.00000000000000000e+00</y>
					<z>1.00000000000000000e+00</z>
				</color>
				<wire>0</wire>
				<highlight>0</highlight>
			</px>
		</subD>
		<tags class_id="6" tracking_level="0" version="0">
			<count>5</count>
			<item_version>0</item_version>
			<item>author=root~(root@runner-jzdhzrer5-project-10133144-concurrent-0)</item>
			<item>isoTime=20260718T115545</item>
			<item>id=20260718T115545p522</item>
			<item>d.id=20260718T115545p522</item>
			<item>id.d=20260718T115545p522</item>
		</tags>
		<engines class_id="7" tracking_level="0" version="0">
			<count>1</count>
			<item_version>1</item_version>
			<item class_id="8" tracking_level="0" version="1">
				<px class_id="10" class_name="yade::GravityEngine" tracking_level="1" version="0" object_id="_4">
					<FieldApplier class_id="11" tracking_level="1" version="0" object_id="_5">
						<GlobalEngine class_id="12" tracking_level="1" version="0" object_id="_6">
							<Engine class_id="9" tracking_level="1" version="0" object_id="_7">
								<Serializable object_id="_8"></Serializable>
								<dead>0</dead>
								<ompThreads>-1</ompThreads>
								<label></label>
							</Engine>
						</GlobalEngine>
					</FieldApplier>
					<gravity>
						<x>0.00000000000000000e+00</x>
						<y>0.00000000000000000e+00</y>
						<z>-9.81000000000000050e+00</z>
					</gravity>
					<mask>0</mask>
					<warnOnce>1</warnOnce>
				</px>
			</item>
		</engines>
		<_nextEngines>
			<count>0</count>
			<item_version>1</item_version>
		</_nextEngines>
		<bodies class_id="13" tracking_level="0" version="1">
			<px class_id="14" tracking_level="1" version="0" object_id="_9">
				<Serializable object_id="_10"></Serializable>
				<body class_id="15" tracking_level="0" version="0">
					<count>0</count>
					<item_version>1</item_version>
				</body>
				<insertedBodies>
					<count>0</count>
					<item_version>0</item_version>
				</insertedBodies>
				<erasedBodies>
					<count>0</count>
					<item_version>0</item_version>
				</erasedBodies>
				<realBodies>
					<count>0</count>
					<item_version>0</item_version>
				</realBodies>
				<useRedirection>0</useRedirection>
				<enableRedirection>1</enableRedirection>
				<subdomainBodies>
					<count>0</count>
					<item_version>0</item_version>
				</subdomainBodies>
			</px>
		</bodies>
		<interactions class_id="17" tracking_level="0" version="1">
			<px class_id="18" tracking_level="1" version="0" object_id="_11">
				<Serializable object_id="_12"></Serializable>
				<interaction class_id="19" tracking_level="0" version="0">
					<count>0</count>
					<item_version>1</item_version>
				</interaction>
				<serializeSorted>0</serializeSorted>
				<dirty>1</dirty>
			</px>
		</interactions>
		<energy class_id="20" tracking_level="0" version="1">
			<px class_id="21" tracking_level="1" version="0" object_id="_13">
				<Serializable object_id="_14"></Serializable>
				<energies class_id="22" tracking_level="0" version="0">
					<size>0</size>
				</energies>
				<names class_id="23" tracking_level="0" version="0">
					<count>0</count>
					<item_version>0</item_version>
				</names>
				<resetStep>
					<count>0</count>
				</resetStep>
			</px>
		</energy>
		<materials class_id="25" tracking_level="0" version="0">
			<count>0</count>
			<item_version>1</item_version>
		</materials>
		<bound class_id="26" tracking_level="0" version="1">
			<px class_id="-1"></px>
		</bound>
		<cell class_id="28" tracking_level="0" version="1">
			<px class_id="29" tracking_level="1" version="0" object_id="_15">
				<Serializable object_id="_16"></Serializable>
				<trsf class_id="30" tracking_level="0" version="0">
					<m00>1.00000000000000000e+00</m00>
					<m01>0.00000000000000000e+00</m01>
					<m02>0.00000000000000000e+00</m02>
					<m10>0.00000000000000000e+00</m10>
					<m11>1.00000000000000000e+00</m11>
					<m12>0.00000000000000000e+00</m12>
					<m20>0.00000000000000000e+00</m20>
					<m21>0.00000000000000000e+00</m21>
					<m22>1.00000000000000000e+00</m22>
				</trsf>
				<refHSize>
					<m00>1.00000000000000000e+00</m00>
					<m01>0.00000000000000000e+00</m01>
					<m02>0.00000000000000000e+00</m02>
					<m10>0.00000000000000000e+00</m10>
					<m11>1.00000000000000000e+00</m11>
					<m12>0.00000000000000000e+00</m12>
					<m20>0.00000000000000000e+00</m20>
					<m21>0.00000000000000000e+00</m21>
					<m22>1.00000000000000000e+00</m22>
				</refHSize>
				<hSize>
					<m00>1.00000000000000000e+00</m00>
					<m01>0.00000000000000000e+00</m01>
					<m02>0.00000000000000000e+00</m02>
					<m10>0.00000000000000000e+00</m10>
					<m11>1.00000000000000000e+00</m11>
					<m12>0.00000000000000000e+00</m12>
					<m20>0.00000000000000000e+00</m20>
					<m21>0.00000000000000000e+00</m21>
					<m22>1.00000000000000000e+00</m22>
				</hSize>
				<prevHSize>
					<m00>1.00000000000000000e+00</m00>
					<m01>0.00000000000000000e+00</m01>
					<m02>0.00000000000000000e+00</m02>
					<m10>0.00000000000000000e+00</m10>
					<m11>1.00000000000000000e+00</m11>
					<m12>0.00000000000000000e+00</m12>
					<m20>0.00000000000000000e+00</m20>
					<m21>0.00000000000000000e+00</m21>
					<m22>1.00000000000000000e+00</m22>
				</prevHSize>
				<velGrad>
					<m00>0.00000000000000000e+00</m00>
					<m01>0.00000000000000000e+00</m01>
					<m02>0.00000000000000000e+00</m02>
					<m10>0.00000000000000000e+00</m10>
					<m11>0.00000000000000000e+00</m11>
					<m12>0.00000000000000000e+00</m12>
					<m20>0.00000000000000000e+00</m20>
					<m21>0.00000000000000000e+00</m21>
					<m22>0.00000000000000000e+00</m22>
				</velGrad>
				<nextVelGrad>
					<m00>0.00000000000000000e+00</m00>
					<m01>0.00000000000000000e+00</m01>
					<m02>0.00000000000000000e+00</m02>
					<m10>0.00000000000000000e+00</m10>
					<m11>0.00000000000000000e+00</m11>
					<m12>0.00000000000000000e+00</m12>
					<m20>0.00000000000000000e+00</m20>
					<m21>0.00000000000000000e+00</m21>
					<m22>0.00000000000000000e+00</m22>
				</nextVelGrad>
				<prevVelGrad>
					<m00>0.00000000000000000e+00</m00>
					<m01>0.00000000000000000e+00</m01>
					<m02>0.00000000000000000e+00</m02>
					<m10>0.00000000000000000e+00</m10>
					<m11>0.00000000000000000e+00</m11>
					<m12>0.00000000000000000e+00</m12>
					<m20>0.00000000000000000e+00</m20>
					<m21>0.00000000000000000e+00</m21>
					<m22>0.00000000000000000e+00</m22>
				</prevVelGrad>
				<homoDeform>2</homoDeform>
				<velGradChanged>0</velGradChanged>
				<flipFlippable>0</flipFlippable>
			</px>
		</cell>
		<miscParams class_id="31" tracking_level="0" version="0">
			<count>0</count>
			<item_version>1</item_version>
		</miscParams>
		<dispParams class_id="32" tracking_level="0" version="0">
			<count>0</count>
			<item_version>1</item_version>
		</dispParams>
	</px>
</scene>
</boost_serialization>
Warning
Since XML files closely reflect implementation details of Yade, they will not be compatible between different versions. Use them only for short-term saving of scenes. Python is the high-level description Yade uses.
Python attribute access
The macro YADE_CLASS_BASE_DOC_* macro family introduced above is (behind the scenes) also used to create functions for accessing attributes from Python. As already noted, set of serialized attributes and set of attributes accessible from Python are identical. Besides attribute access, these wrapper classes imitate also some functionality of regular python dictionaries:
Yade [20]: s=Sphere()

Yade [21]: s.radius              ## read-access
Out[21]: nan

Yade [22]: s.radius=4.           ## write access

Yade [23]: s.dict().keys()              ## show all available keys
Out[23]: dict_keys(['radius', 'color', 'wire', 'highlight'])

Yade [24]: for k in s.dict().keys(): print(s.dict()[k])  ## iterate over keys, print their values
   ....:
4.0
Vector3(1,1,1)
False
False

Yade [25]: s.dict()['radius']             ## same as: 'radius' in s.keys()
Out[25]: 4.0

Yade [26]: s.dict()                       ## show dictionary of both attributes and values
Out[26]: {'radius': 4.0, 'color': Vector3(1,1,1), 'wire': False, 'highlight': False}
YADE_CLASS_BASE_DOC_* macro family
There are several macros that hide behind them the functionality of Sphinx documentation, Run-time type identification (RTTI), Attribute registration, Python attribute access, plus automatic attribute initialization and documentation. They are all defined as shorthands for the macro YADE_CLASS_BASE_DOC_ATTRS_INIT_CTOR_PY, which is itself a shorthand for the base macro YADE_CLASS_BASE_DOC_ATTRS_DEPREC_INIT_CTOR_PY with some arguments left out. They must be placed in class declaration’s body (.hpp file):
#define YADE_CLASS_BASE_DOC(klass,base,doc) \
        YADE_CLASS_BASE_DOC_ATTRS(klass,base,doc,)
#define YADE_CLASS_BASE_DOC_ATTRS(klass,base,doc,attrs) \
        YADE_CLASS_BASE_DOC_ATTRS_CTOR(klass,base,doc,attrs,)
#define YADE_CLASS_BASE_DOC_ATTRS_CTOR(klass,base,doc,attrs,ctor) \
        YADE_CLASS_BASE_DOC_ATTRS_CTOR_PY(klass,base,doc,attrs,ctor,)
#define YADE_CLASS_BASE_DOC_ATTRS_CTOR_PY(klass,base,doc,attrs,ctor,py) \
        YADE_CLASS_BASE_DOC_ATTRS_INIT_CTOR_PY(klass,base,doc,attrs,,ctor,py)
#define YADE_CLASS_BASE_DOC_ATTRS_INIT_CTOR_PY(klass,base,doc,attrs,init,ctor,py) \
        YADE_CLASS_BASE_DOC_ATTRS_INIT_CTOR_PY(klass,base,doc,attrs,inits,ctor,py)
Expected parameters are indicated by macro name components separated with underscores. Their meaning is as follows:
klass(unquoted) name of this class (used for RTTI and python)
base(unquoted) name of the base class (used for RTTI and python)
docdocstring of this class, written in the ReST syntax. This docstring will appear in generated documentation (such as CpmMat). It can be as long as necessary, use string literal to avoid sequences interpreted by c++ compiler (so that some backslashes don’t have to be doubled, like in \(\sigma=\epsilon E\)) instead of writing this:
":math:`\\sigma=\\epsilon E"
Write following:
R"""(:math:`\sigma=\epsilon E`)""". When theR"""(raw text)"""is used the escaped characters\nand\tdo not have to be written. Newlines and tabs can be used instead. For example see here and here. Hyperlink the documentation abundantly withyref(all references to other classes should be hyperlinks). See previous section about syntax on using references and anchors.attrsAttribute must be written in the form of parethesized list:
((type1,attr1,initValue1,attrFlags,"Attribute 1 documentation"))
((type2,attr2,,,"Attribute 2 documentation"))  // initValue and attrFlags unspecified
This will expand to
data members declaration in c++ (note that all attributes are public):
public: type1 attr1;
        type2 attr2;
Initializers of the default (argument-less) constructor, for attributes that have non-empty
initValue:Klass(): attr1(initValue1), attr2() { /* constructor body */ }
No initial value will be assigned for attribute of which initial value is left empty (as is for attr2 in the above example). Note that you still have to write the commas.
Registration of the attribute in the serialization system (unless disabled by attrFlags – see below)
- Registration of the attribute in python (unless disabled by attrFlags), so that it can be accessed as
klass().name1. The attribute is read-write by default, see attrFlags to change that.
This attribute will carry the docstring provided, along with knowledge of the initial value. You can add text description to the default value using the comma operator of c++ and casting the char* to (void):
((Real,dmgTau,((void)"deactivated if negative",-1),,"Characteristic time for normal viscosity. [s]"))
leading to CpmMat::dmgTau.
The attribute is registered via
boost::python::add_propertyspecifyingreturn_by_valuepolicy rather thanreturn_internal_reference, which is the default when usingdef_readwrite. The reason is that we need to honor custom converters for those values; see note in Custom converters for details.
- Registration of the attribute in python (unless disabled by attrFlags), so that it can be accessed as
Attribute flags
By default, an attribute will be serialized and will be read-write from python. There is a number of flags that can be passed as the 4th argument (empty by default) to change that:
Attr::noSaveavoids serialization of the attribute (while still keeping its accessibility from Python)
Attr::readonlymakes the attribute read-only from Python
Attr::triggerPostLoadwill trigger call topostLoadfunction to handle attribute change after its value is set from Python; this is to ensure consistency of other precomputed data which depend on this value (such asCell.trsfand such)
Attr::hiddenwill not expose the attribute to Python at all
Attr::noResizewill not permit changing size of the array from Python [not yet used]Flags can be combined as usual using bitwise disjunction
|(such asAttr::noSave | Attr::readonly), though in such case the value should be parenthesized to avoid a warning with some compilers (g++ specifically), i.e.(Attr::noSave | Attr::readonly).Currently, the flags logic handled at runtime; that means that even for attributes with
Attr::noSave, their serialization template must be defined (although it will never be used). In the future, the implementation might be template-based, avoiding this necessity.
deprecList of deprecated attribute names. The syntax is
((oldName1,newName1,"Explanation why renamed etc."))
((oldName2,newName2,"! Explanation why removed and what to do instead."))
This will make accessing
oldName1attribute from Python return value ofnewName, but displaying warning message about the attribute name change, displaying provided explanation. This happens whether the access is read or write.If the explanation’s first character is
!(bang), the message will be displayed upon attribute access, but exception will be thrown immediately. Use this in cases where attribute is no longer meaningful or was not straightforwardsly replaced by another, but more complex adaptation of user’s script is needed. You still have to givenewName2, although its value will never be used – you can use any variable you like, but something must be given for syntax reasons).Warning
Due to compiler limitations, this feature only works if Yade is compiled with gcc >= 4.4. In the contrary case, deprecated attribute functionality is disabled, even if such attributes are declared.
initParethesized list of the form:
((attr3,value3)) ((attr4,value4))
which will be expanded to initializers in the default ctor:
Klass(): /* attributes declared with the attrs argument */ attr4(value4), attr5(value5) { /* constructor body */ }
The purpose of this argument is to make it possible to initialize constants and references (which are not declared as attributes using this macro themselves, but separately), as that cannot be done in constructor body. This argument is rarely used, though.
ctorwill be put directly into the generated constructor’s body. Mostly used for calling createIndex(); in the constructor.
Note
The code must not contain commas outside parentheses (since preprocessor uses commas to separate macro arguments). If you need complex things at construction time, create a separate init() function and call it from the constructor instead.
pywill be appended directly after generated python code that registers the class and all its attributes. You can use it to access class methods from python, for instance, to override an existing attribute with the same name etc:
.def_readonly("omega",&CpmPhys::omega,"Damage internal variable")
.def_readonly("Fn",&CpmPhys::Fn,"Magnitude of normal force.")
def_readonlywill not work for custom types (such as std::vector), as it bypasses conversion registry; see Custom converters for details.
Exposing function-attributes to GUI
Usually to expose a more complex data a getter and setter functions are used, for example Body::mask. They are accessible from python. To make them visible in GUI without a corresponding variable at all a function virtual ::boost::python::dict pyDictCustom() const { …… }; must be overridden. For example see Interaction.hpp where a special attribute isReal is exposed to GUI. To mark such attribute as readonly an extra information has to be added to its docstring: :yattrflags:`2`. Normally it is put there by the class attribute registration macros. But since it is not a variable, such attribute has to be added manually.
Special python constructors
The Python wrapper automatically creates constructor that takes keyword (named) arguments corresponding to instance attributes; those attributes are set to values provided in the constructor. In some cases, more flexibility is desired (such as InteractionLoop, which takes 3 lists of functors). For such cases, you can override the function Serializable::pyHandleCustomCtorArgs, which can arbitrarily modify the new (already existing) instance. It should modify in-place arguments given to it, as they will be passed further down to the routine which sets attribute values. In such cases, you should document the constructor:
.. admonition:: Special constructor

        Constructs from lists of …
which then appears in the documentation similar to InteractionLoop.
Enums
It is possible to expose enum class in GUI in a dropdown menu. This approach is backward compatible, an assignment of int value in an old python script will work the same as before. Additionally it will be possible to assign the string type values to an enum. To enable the dropdown menu one must #include <lib/serialization/EnumSupport.hpp> and put a macro YADE_ENUM( Scope , EnumName , (ValueName1)(ValueName2)(ValueName3)(ValueName4) ) in a .cpp file. Where each macro argument means:
Scopeis the full scope name in which the enum resides. For example the scope ofyade::OpenGLRenderer::BlinkHighlightisyade::OpenGLRenderer.
EnumNameis the name of the enum type (not variable name!) to be registered
ValueNameare all enum values that are to be exposed to python. They have to be updated if the C++ enum declaration in.hppfile changes.
After it is registered, like for example in OpenGLRenderer.cpp it is available for use. Additionally the registered enum class type definitions are exposed in yade.EnumClass_* scope, for example one can check the names and values dictionaries:
Yade [27]: yade.EnumClass_BlinkHighlight.names
Out[27]:
{'NEVER': yade.EnumClass_BlinkHighlight.NEVER,
 'NORMAL': yade.EnumClass_BlinkHighlight.NORMAL,
 'WEAK': yade.EnumClass_BlinkHighlight.WEAK}

Yade [28]: yade.EnumClass_BlinkHighlight.values
Out[28]:
{0: yade.EnumClass_BlinkHighlight.NEVER,
 1: yade.EnumClass_BlinkHighlight.NORMAL,
 2: yade.EnumClass_BlinkHighlight.WEAK}
Keep in mind that these are not the variable instances hence trying to assign something to them will not change the blinkHighlight setting in GUI. To change enum value from python the respective variable must be assigned to, such as yade.qt.Renderer().blinkHighlight. Trying to assign an incorrect value will throw an exception. For example:
Yade [29]: r = yade.NewtonIntegrator() # this is only a test of enum, not of NewtonIntegrator

Yade [30]: r.rotAlgorithm # check current rotation algorithm (also available in the GUI Inspector of Engines)
Out[30]: yade.EnumClass_RotAlgorithm.delValle2023

Yade [31]: r.rotAlgorithm = 'Omelyan1998'

Yade [32]: try:
   ....:     r.rotAlgorithm = 20    # assigning incorrect value throws an exception
   ....: except:
   ....:     print("Error, value is still equal to:",r.rotAlgorithm)
   ....:
Error, value is still equal to: Omelyan1998

Yade [33]: r.rotAlgorithm
Out[33]: yade.EnumClass_RotAlgorithm.Omelyan1998
Alternatively the dropdown menu in GUI can be used for the same effect.
Static attributes
Some classes (such as OpenGL functors) are instantiated automatically; since we want their attributes to be persistent throughout the session, they are static. To expose class with static attributes, use the YADE_CLASS_BASE_DOC_STATICATTRS macro. Attribute syntax is the same as for YADE_CLASS_BASE_DOC_ATTRS:
class SomeClass: public BaseClass{
        YADE_CLASS_BASE_DOC_STATICATTRS(SomeClass,BaseClass,"Documentation of SomeClass",
                ((Type1,attr1,default1,"doc for attr1"))
                ((Type2,attr2,default2,"doc for attr2"))
        );
};
additionally, you have to allocate memory for static data members in the .cpp file (otherwise, error about undefined symbol will appear when the plugin is loaded):
There is no way to expose class that has both static and non-static attributes using YADE_CLASS_BASE_* macros. You have to expose non-static attributes normally and wrap static attributes separately in the py parameter.
Returning attribute by value or by reference
When attribute is passed from c++ to python, it can be passed either as
value: new python object representing the original c++ object is constructed, but not bound to it; changing the python object doesn’t modify the c++ object, unless explicitly assigned back to it, where inverse conversion takes place and the c++ object is replaced.
reference: only reference to the underlying c++ object is given back to python; modifying python object will make the c++ object modified automatically.
The way of passing attributes given to YADE_CLASS_BASE_DOC_ATTRS in the attrs parameter is determined automatically in the following manner:
Vector3,Vector3i,Vector2,Vector2i,Matrix3andQuaternionobjects are passed by reference. For instance::O.bodies[0].state.pos[0]=1.33
will assign correct value to
xcomponent of position, without changing the other ones.- Yade classes (all that use
shared_ptrwhen declared in python: all classes deriving from Serializable declared withYADE_CLASS_BASE_DOC_*, and some others) are passed as references (technically speaking, they are passed by value of theshared_ptr, but by virtue of its sharedness, they appear as references). For instance:: O.engines[4].damping=.3
will change damping parameter on the original engine object, not on its copy.
- Yade classes (all that use
- All other types are passed by value. This includes, most importantly, sequence types declared in Custom converters, such as
std::vector<shared_ptr<Engine> >. For this reason, :: O.engines[4]=NewtonIntegrator()
will not work as expected; it will replace 5th element of a copy of the sequence, and this change will not propagate back to c++.
- All other types are passed by value. This includes, most importantly, sequence types declared in Custom converters, such as
Multiple dispatch
Multiple dispatch is generalization of virtual methods: a Dispatcher decides based on type(s) of its argument(s) which of its Functors to call. Number of arguments (currently 1 or 2) determines arity of the dispatcher (and of the functor): unary or binary. For example:
InsertionSortCollider([Bo1_Sphere_Aabb(),Bo1_Facet_Aabb()])
creates InsertionSortCollider, which internally contains Collider.boundDispatcher, a BoundDispatcher (a Dispatcher), with 2 functors; they receive Sphere or Facet instances and create Aabb. This code would look like this in c++:
shared_ptr<InsertionSortCollider> collider=(new InsertionSortCollider);
collider->boundDispatcher->add(new Bo1_Sphere_Aabb());
collider->boundDispatcher->add(new Bo1_Facet_Aabb());
There are currenly 4 predefined dispatchers (see dispatcher-names) and corresponding functor types. They are inherited from template instantiations of Dispatcher1D or Dispatcher2D (for functors, Functor1D or Functor2D). These templates themselves derive from DynlibDispatcher (for dispatchers) and FunctorWrapper (for functors).
Example: IGeomDispatcher
Let’s take (the most complicated perhaps) IGeomDispatcher. IGeomFunctor, which is dispatched based on types of 2 Shape instances (a Functor), takes a number of arguments and returns bool. The functor “call” is always provided by its overridden Functor::go method; it always receives the dispatched instances as first argument(s) (2 × const shared_ptr<Shape>&) and a number of other arguments it needs:
class IGeomFunctor: public Functor2D<
   bool,                                 //return type
   TYPELIST_7(const shared_ptr<Shape>&,  // 1st class for dispatch
      const shared_ptr<Shape>&,          // 2nd class for dispatch
      const State&,                      // other arguments passed to ::go
      const State&,                      // …
      const Vector3r&,                   // …
      const bool&,                       // …
      const shared_ptr<Interaction>&     // …
   )
>
The dispatcher is declared as follows:
class IGeomDispatcher: public Dispatcher2D<
   Shape,                       // 1st class for dispatch
   Shape,                       // 2nd class for dispatch
   IGeomFunctor,  // functor type
   bool,                        // return type of the functor

   // follow argument types for functor call
   // they must be exactly the same as types
   // given to the IGeomFunctor above.
   TYPELIST_7(const shared_ptr<Shape>&,
      const shared_ptr<Shape>&,
      const State&,
      const State&,
      const Vector3r&,
      const bool &,
      const shared_ptr<Interaction>&
   ),

   // handle symetry automatically
   // (if the dispatcher receives Sphere+Facet,
   // the dispatcher might call functor for Facet+Sphere,
   // reversing the arguments)
   false
>
{ /* … */ }
Functor derived from IGeomFunctor must then
override the ::go method with appropriate arguments (they must match exactly types given to
TYPELIST_*macro);declare what types they should be dispatched for, and in what order if they are not the same.
class Ig2_Facet_Sphere_ScGeom: public IGeomFunctor{
   public:

   // override the IGeomFunctor::go
   //   (it is really inherited from FunctorWrapper template,
   //    therefore not declare explicitly in the
   //    IGeomFunctor declaration as such)
   // since dispatcher dispatches only for declared types
   //   (or types derived from them), we can do
   //   static_cast<Facet>(shape1) and static_cast<Sphere>(shape2)
   //   in the ::go body, without worrying about types being wrong.
   virtual bool go(
      // objects for dispatch
      const shared_ptr<Shape>& shape1, const shared_ptr<Shape>& shape2,
      // other arguments
      const State& state1, const State& state2, const Vector3r& shift2,
      const bool& force, const shared_ptr<Interaction>& c
   );
   /* … */

   // this declares the type we want to be dispatched for, matching
   //   first 2 arguments to ::go and first 2 classes in TYPELIST_7 above
   //   shape1 is a Facet and shape2 is a Sphere
   //   (or vice versa, see lines below)
   FUNCTOR2D(Facet,Sphere);

   // declare how to swap the arguments
   //   so that we can receive those as well
   DEFINE_FUNCTOR_ORDER_2D(Facet,Sphere);
   /* … */
};
Dispatch resolution
The dispatcher doesn’t always have functors that exactly match the actual types it receives. In the same way as virtual methods, it tries to find the closest match in such way that:
the actual instances are derived types of those the functor accepts, or exactly the accepted types;
sum of distances from actual to accepted types is sharp-minimized (each step up in the class hierarchy counts as 1)
If no functor is able to accept given types (first condition violated) or multiple functors have the same distance (in condition 2), an exception is thrown.
This resolution mechanism makes it possible, for instance, to have a hierarchy of ScGeom classes (for different combination of shapes), but only provide a LawFunctor accepting ScGeom, rather than having different laws for each shape combination.
Note
Performance implications of dispatch resolution are relatively low. The dispatcher lookup is only done once, and uses fast lookup matrix (1D or 2D); then, the functor found for this type(s) is cached within the Interaction (or Body) instance. Thus, regular functor call costs the same as dereferencing pointer and calling virtual method. There is blueprint to avoid virtual function call as well.
Note
At the beginning, the dispatch matrix contains just entries exactly matching given functors. Only when necessary (by passing other types), appropriate entries are filled in as well.
Indexing dispatch types
Classes entering the dispatch mechanism must provide for fast identification of themselves and of their parent class. [5] This is called class indexing and all such classes derive from Indexable. There are top-level Indexables (types that the dispatchers accept) and each derived class registers its index related to this top-level Indexable. Currently, there are:
Top-level Indexable |
used by |
|---|---|
The top-level Indexable must use the REGISTER_INDEX_COUNTER macro, which sets up the machinery for identifying types of derived classes; they must then use the REGISTER_CLASS_INDEX macro and call createIndex() in their constructor. For instance, taking the Shape class (which is a top-level Indexable):
// derive from Indexable
class Shape: public Serializable, public Indexable {
   // never call createIndex() in the top-level Indexable ctor!
   /* … */

   // allow index registration for classes deriving from ``Shape``
   REGISTER_INDEX_COUNTER(Shape);
};
Now, all derived classes (such as Sphere or Facet) use this:
class Sphere: public Shape{
   /* … */
   YADE_CLASS_BASE_DOC_ATTRS_CTOR(Sphere,Shape,"docstring",
      ((Type1,attr1,default1,"docstring1"))
      /* … */,
      // this is the CTOR argument
         // important; assigns index to the class at runtime
         createIndex();
   );
   // register index for this class, and give name of the immediate parent class
   //    (i.e. if there were a class deriving from Sphere, it would use
   //     REGISTER_CLASS_INDEX(SpecialSphere,Sphere),
   //     not REGISTER_CLASS_INDEX(SpecialSphere,Shape)!)
   REGISTER_CLASS_INDEX(Sphere,Shape);
};
At runtime, each class within the top-level Indexable hierarchy has its own unique numerical index. These indices serve to build the dispatch matrix for each dispatcher.
Inspecting dispatch in python
If there is a need to debug/study multiple dispatch, python provides convenient interface for this low-level functionality.
We can inspect indices with the dispIndex property (note that the top-level indexable Shape has negative (invalid) class index; we purposively didn’t call createIndex in its constructor):
Yade [34]: Sphere().dispIndex, Facet().dispIndex, Wall().dispIndex
Out[34]: (1, 7, 21)

Yade [35]: Shape().dispIndex                  # top-level indexable
Out[35]: -1
Dispatch hierarchy for a particular class can be shown with the dispHierarchy() function, returning list of class names: 0th element is the instance itself, last element is the top-level indexable (again, with invalid index); for instance:
Yade [36]: ScGeom().dispHierarchy()       # parent class of all other ScGeom_ classes
Out[36]: ['ScGeom', 'GenericSpheresContact', 'IGeom']

Yade [37]: ScGridCoGeom().dispHierarchy(), ScGeom6D().dispHierarchy(), CylScGeom().dispHierarchy()
Out[37]:
(['ScGridCoGeom', 'ScGeom6D', 'ScGeom', 'GenericSpheresContact', 'IGeom'],
 ['ScGeom6D', 'ScGeom', 'GenericSpheresContact', 'IGeom'],
 ['CylScGeom', 'ScGeom', 'GenericSpheresContact', 'IGeom'])

Yade [38]: CylScGeom().dispHierarchy(names=False)   # show numeric indices instead
Out[38]: [4, 1, 0, -1]
Dispatchers can also be inspected, using the .dispMatrix() method:
Yade [39]: ig=IGeomDispatcher([
   ....:    Ig2_Sphere_Sphere_ScGeom(),
   ....:    Ig2_Facet_Sphere_ScGeom(),
   ....:    Ig2_Wall_Sphere_ScGeom()
   ....: ])
   ....:

Yade [40]: ig.dispMatrix()
Out[40]:
{('Sphere', 'Sphere'): 'Ig2_Sphere_Sphere_ScGeom',
 ('Sphere', 'Facet'): 'Ig2_Facet_Sphere_ScGeom',
 ('Sphere', 'Wall'): 'Ig2_Wall_Sphere_ScGeom',
 ('Facet', 'Sphere'): 'Ig2_Facet_Sphere_ScGeom',
 ('Wall', 'Sphere'): 'Ig2_Wall_Sphere_ScGeom'}

Yade [41]: ig.dispMatrix(False)          # don't convert to class names
Out[41]:
{(1, 1): 'Ig2_Sphere_Sphere_ScGeom',
 (1, 7): 'Ig2_Facet_Sphere_ScGeom',
 (1, 21): 'Ig2_Wall_Sphere_ScGeom',
 (7, 1): 'Ig2_Facet_Sphere_ScGeom',
 (21, 1): 'Ig2_Wall_Sphere_ScGeom'}
We can see that functors make use of symmetry (i.e. that Sphere+Wall are dispatched to the same functor as Wall+Sphere).
Finally, dispatcher can be asked to return functor suitable for given argument(s):
Yade [42]: ld=LawDispatcher([Law2_ScGeom_CpmPhys_Cpm()])

Yade [43]: ld.dispMatrix()
Out[43]: {('GenericSpheresContact', 'CpmPhys'): 'Law2_ScGeom_CpmPhys_Cpm'}

# see how the entry for ScGridCoGeom will be filled after this request
Yade [44]: ld.dispFunctor(ScGridCoGeom(),CpmPhys())
Out[44]: <Law2_ScGeom_CpmPhys_Cpm instance at 0x3749c850>

Yade [45]: ld.dispMatrix()
Out[45]:
{('GenericSpheresContact', 'CpmPhys'): 'Law2_ScGeom_CpmPhys_Cpm',
 ('ScGridCoGeom', 'CpmPhys'): 'Law2_ScGeom_CpmPhys_Cpm'}
OpenGL functors
OpenGL rendering is being done also by 1D functors (dispatched for the type to be rendered). Since it is sufficient to have exactly one class for each rendered type, the functors are found automatically. Their base functor types are GlShapeFunctor, GlBoundFunctor, GlIGeomFunctor and so on. These classes register the type they render using the RENDERS macro:
namespace yade { // Cannot have #include directive inside.
class Gl1_Sphere: public GlShapeFunctor {
   public :
      virtual void go(const shared_ptr<Shape>&,
         const shared_ptr<State>&,
         bool wire,
         const GLViewInfo&
      );
   RENDERS(Sphere);
   YADE_CLASS_BASE_DOC_STATICATTRS(Gl1_Sphere,GlShapeFunctor,"docstring",
      ((Type1,staticAttr1,informativeDefault,"docstring"))
      /* … */
   );
};
REGISTER_SERIALIZABLE(Gl1_Sphere);
} // namespace yade
You can list available functors of a particular type by querying child classes of the base functor:
Yade [46]: yade.system.childClasses('GlShapeFunctor')
Out[46]:
{'Gl1_Box',
 'Gl1_ChainedCylinder',
 'Gl1_Cylinder',
 'Gl1_DeformableElement',
 'Gl1_Facet',
 'Gl1_GridConnection',
 'Gl1_LevelSet',
 'Gl1_Node',
 'Gl1_PFacet',
 'Gl1_Polyhedra',
 'Gl1_PotentialBlock',
 'Gl1_PotentialParticle',
 'Gl1_Sphere',
 'Gl1_Tetra',
 'Gl1_Wall'}
Note
OpenGL functors may disappear in the future, being replaced by virtual functions of each class that can be rendered.
Parallel execution
Yade was originally not designed with parallel computation in mind, but rather with maximum flexibility (for good or for bad). Parallel execution was added later; in order to not have to rewrite whole Yade from scratch, relatively non-instrusive way of parallelizing was used: OpenMP. OpenMP is standartized shared-memory parallel execution environment, where parallel sections are marked by special #pragma in the code (which means that they can compile with compiler that doesn’t support OpenMP) and a few functions to query/manipulate OpenMP runtime if necessary.
There is parallelism at 3 levels:
Computation, interaction (python, GUI) and rendering threads are separate. This is done via regular threads (boost::threads) and is not related to OpenMP.
ParallelEngine can run multiple engine groups (which are themselves run serially) in parallel; it rarely finds use in regular simulations, but it could be used for example when coupling with an independent expensive computation:
ParallelEngine([
        [Engine1(),Engine2()],   # Engine1 will run before Engine2
        [Engine3()]              # Engine3() will run in parallel with the group [Engine1(),Engine2()]
                                 # arbitrary number of groups can be used
])
Engine2will be run afterEngine1, but in parallel withEngine3.Warning
It is your reponsibility to avoid concurrent access to data when using ParallelEngine. Make sure you understand very well what the engines run in parallel do.
Parallelism inside Engines. Some loops over bodies or interactions are parallelized (notably InteractionLoop and NewtonIntegrator, which are treated in detail later (FIXME: link)):
#pragma omp parallel for
for(long id=0; id<size; id++){
   const shared_ptr<Body>& b(scene->bodies[id]);
   /* … */
}
Note
OpenMP requires loops over contiguous range of integers (OpenMP 3 also accepts containers with random-access iterators).
If you consider running parallelized loop in your engine, always evalue its benefits. OpenMP has some overhead fo creating threads and distributing workload, which is proportionally more expensive if the loop body execution is fast. The results are highly hardware-dependent (CPU caches, RAM controller).
Maximum number of OpenMP threads is determined by the OMP_NUM_THREADS environment variable and is constant throughout the program run. Yade main program also sets this variable (before loading OpenMP libraries) if you use the -j/--threads option. It can be queried at runtime with the omp_get_max_threads function.
At places which are susceptible of being accessed concurrently from multiple threads, Yade provides some mutual exclusion mechanisms, discussed elsewhere (FIXME):
simultaneously writeable container for ForceContainer,
mutex for Body::state.
Timing
Yade provides 2 services for measuring time spent in different parts of the code. One has the granularity of engine and can be enabled at runtime. The other one is finer, but requires adjusting and recompiling the code being measured.
Per-engine timing
The coarser timing works by merely accumulating number of invocations and time (with the precision of the clock_gettime function) spent in each engine, which can be then post-processed by associated Python module yade.timing. There is a static bool variable controlling whether such measurements take place (disabled by default), which you can change
TimingInfo::enabled=True; // in c++
O.timingEnabled=True ## in python
After running the simulation, yade.timing.stats() function will show table with the results and percentages:
Yade [47]: TriaxialTest(numberOfGrains=100).load()

Yade [48]: O.engines[0].label='firstEngine'   ## labeled engines will show by labels in the stats table

Yade [49]: import yade.timing;

Yade [50]: O.timingEnabled=True

Yade [51]: yade.timing.reset()                   ## not necessary if used for the first time

Yade [52]: O.run(50); O.wait()

Yade [53]: yade.timing.stats()
Name                                                    Count                 Time            Rel. time
-------------------------------------------------------------------------------------------------------
"firstEngine"                                        50             36.404us                0.78%
InsertionSortCollider                                26           1400.292us               30.11%
InteractionLoop                                      50           1977.856us               42.54%
GlobalStiffnessTimeStepper                            2             36.288us                0.78%
TriaxialCompressionEngine                            50            385.264us                8.29%
TriaxialStateRecorder                                 3            210.068us                4.52%
NewtonIntegrator                                     50            603.712us               12.98%
  forces sync                                          50              5.664us                0.94%
  motion integration                                   50            587.388us               97.30%
  sync max vel                                         50              2.892us                0.48%
  terminate                                            50              1.828us                0.30%
  TOTAL                                               200            597.772us               99.02%
TOTAL                                                             4649.884us              100.00%
Exec count and time can be accessed and manipulated through Engine::timingInfo from c++ or Engine().execCount and Engine().execTime properties in Python.
In-engine and in-functor timing
Timing within engines (and functors) is based on TimingDeltas class which is by default instantiated in engines and functors as Engine::timingDeltas and Functor::timingDeltas (Engine.timingDeltas and Functor.timingDeltas in Python). It is made for timing loops (functors’ loop is in their respective dispatcher) and stores cummulatively time differences between checkpoints.
Note
Fine timing with TimingDeltas will only work if timing is enabled globally (see previous section). The code would still run, but giving zero times and exec counts.
Preferably define the timingDeltas attributes in the constructor:
// header file
class Law2_ScGeom_CpmPhys_Cpm: public LawFunctor {
   /* … */
   YADE_CLASS_BASE_DOC_ATTRS_CTOR(Law2_ScGeom_CpmPhys_Cpm,LawFunctor,"docstring",
      /* attrs */,
      /* constructor */
      timingDeltas=shared_ptr<TimingDeltas>(new TimingDeltas); // timingDeltas object is automatically initialized when using -DENABLE_PROFILING=1 cmake option
   );
   // ...
};
Inside the loop, start the timing by calling
timingDeltas->start();At places of interest, call
timingDeltas->checkpoint("label"). The label is used only for post-processing, data are stored based on the checkpoint position, not the label.Warning
Checkpoints must be always reached in the same order, otherwise the timing data will be garbage. Your code can still branch, but you have to put checkpoints to places which are in common.
void Law2_ScGeom_CpmPhys_Cpm::go(shared_ptr<IGeom>& _geom,
                                      shared_ptr<IPhys>& _phys,
                                      Interaction* I,
                                      Scene* scene)
{
   timingDeltas->start();                        // the point at which the first timing starts
   // prepare some variables etc here
   timingDeltas->checkpoint("setup");
   // find geometrical data (deformations) here
   timingDeltas->checkpoint("geom");
   // compute forces here
   timingDeltas->checkpoint("material");
   // apply forces, cleanup here
   timingDeltas->checkpoint("rest");
}
- Alternatively, you can compile Yade using -DENABLE_PROFILING=1 cmake option and use predefined macros TIMING_DELTAS_START and TIMING_DELTAS_CHECKPOINT. Without -DENABLE_PROFILING options, those macros are empty and do nothing.
void Law2_ScGeom_CpmPhys_Cpm::go(shared_ptr<IGeom>& _geom,
                                      shared_ptr<IPhys>& _phys,
                                      Interaction* I,
                                      Scene* scene)
{
   TIMING_DELTAS_START();
   // prepare some variables etc here
   TIMING_DELTAS_CHECKPOINT("setup")
   // find geometrical data (deformations) here
   TIMING_DELTAS_CHECKPOINT("geom")
   // compute forces here
   TIMING_DELTAS_CHECKPOINT("material")
   // apply forces, cleanup here
   TIMING_DELTAS_CHECKPOINT("rest")
}
The output might look like this (note that functors are nested inside dispatchers and TimingDeltas inside their engine/functor):
Name                                    Count                 Time          Rel. time
-------------------------------------------------------------------------------------
ForceReseter                        400               9449μs              0.01%
BoundDispatcher                     400            1171770μs              1.15%
InsertionSortCollider               400            9433093μs              9.24%
IGeomDispatcher       400           15177607μs             14.87%
IPhysDispatcher        400            9518738μs              9.33%
LawDispatcher                       400           64810867μs             63.49%
  Law2_ScGeom_CpmPhys_Cpm
    setup                           4926145            7649131μs             15.25%
    geom                            4926145           23216292μs             46.28%
    material                        4926145            8595686μs             17.14%
    rest                            4926145           10700007μs             21.33%
    TOTAL                                             50161117μs            100.00%
NewtonIntegrator                    400            1866816μs              1.83%
"strainer"                          400              21589μs              0.02%
"plotDataCollector"                 160              64284μs              0.06%
"damageChecker"                       9               3272μs              0.00%
TOTAL                                            102077490μs            100.00%
Warning
Do not use TimingDeltas in parallel sections, results might not be meaningful. In particular, avoid timing functors inside InteractionLoop when running with multiple OpenMP threads.
TimingDeltas data are accessible from Python as list of (label,*time*,*count*) tuples, one tuple representing each checkpoint:
deltas=someEngineOrFunctor.timingDeltas.data()
deltas[0][0] # 0th checkpoint label
deltas[0][1] # 0th checkpoint time in nanoseconds
deltas[0][2] # 0th checkpoint execution count
deltas[1][0] # 1st checkpoint label
             # …
deltas.reset()
Timing overhead
The overhead of the coarser, per-engine timing, is very small. For simulations with at least several hundreds of elements, they are below the usual time variance (a few percent).
The finer TimingDeltas timing can have major performance impact and should be only used during debugging and performance-tuning phase. The parts that are file-timed will take disproportionally longer time that the rest of engine; in the output presented above, LawDispatcher takes almost ⅔ of total simulation time in average, but the number would be twice of thrice lower typically (note that each checkpoint was timed almost 5 million times in this particular case).
OpenGL Rendering
Yade provides 3d rendering based on QGLViewer. It is not meant to be full-featured rendering and post-processing, but rather a way to quickly check that scene is as intended or that simulation behaves sanely.
Note
Although 3d rendering runs in a separate thread, it has performance impact on the computation itself, since interaction container requires mutual exclusion for interaction creation/deletion. The InteractionContainer::drawloopmutex is either held by the renderer (OpenGLRenderingEngine) or by the insertion/deletion routine.
Warning
There are 2 possible causes of crash, which are not prevented because of serious performance penalty that would result:
access to BodyContainer, in particular deleting bodies from simulation; this is a rare operation, though.
deleting Interaction::phys or Interaction::geom.
Renderable entities (Shape, State, Bound, IGeom, IPhys) have their associated OpenGL functors. An entity is rendered if
Rendering such entities is enabled by appropriate attribute in OpenGLRenderingEngine
Functor for that particular entity type is found via the dispatch mechanism.
Gl1_* functors operating on Body’s attributes (Shape, State, Bound) are called with the OpenGL context translated and rotated according to State::pos and State::ori. Interaction functors work in global coordinates.
Simulation framework
Besides the support framework mentioned in the previous section, some functionality pertaining to simulation itself is also provided.
There are special containers for storing bodies, interactions and (generalized) forces. Their internal functioning is normally opaque to the programmer, but should be understood as it can influence performance.
Scene
Scene is the object containing the whole simulation. Although multiple scenes can be present in the memory, only one of them is active. Saving and loading (serializing and deserializing) the Scene object should make the simulation run from the point where it left off.
Note
All Engines and functors have interally a Scene* scene pointer which is updated regularly by engine/functor callers; this ensures that the current scene can be accessed from within user code.
For outside functions (such as those called from python, or static functions in Shop), you can use Omega::instance().getScene() to retrieve a shared_ptr<Scene> of the current scene.
Body container
Body container is linear storage of bodies. Each body in the simulation has its unique id, under which it must be found in the BodyContainer. Body that is not yet part of the simulation typically has id equal to invalid value Body::ID_NONE, and will have its id assigned upon insertion into the container.
The requirements on BodyContainer are
O(1) access to elements,
linear-addressability (0…n indexability),
store
shared_ptr, not objects themselves,no mutual exclusion for insertion/removal (this must be assured by the called, if desired),
intelligent allocation of
idfor new bodies (tracking removed bodies),easy iteration over all bodies.
Note
Currently, there is “abstract” class BodyContainer, from which derive concrete implementations; the initial idea was the ability to select at runtime which implementation to use (to find one that performs the best for given simulation). This incurs the penalty of many virtual function calls, and will probably change in the future. All implementations of BodyContainer were removed in the meantime, except BodyVector (internally a vector<shared_ptr<Body> > plus a few methods around), which is the fastest.
Insertion/deletion
Body insertion is typically used in FileGenerator’s:
shared_ptr<Body> body(new Body);
// … (body setup)
scene->bodies->insert(body); // assigns the id
Bodies are deleted only rarely:
scene->bodies->erase(id);
Warning
Since mutual exclusion is not assured, never insert/erase bodies from parallel sections, unless you explicitly assure there will be no concurrent access.
Iteration
The container can be iterated over using for(const auto& …… : …… ) C++ syntax:
for(const auto& b : *scene->bodies){
   if(!b) continue;                      // skip deleted bodies, nullptr-check
   /* do something here */
}
The same loop can be also written by using the type const shared_ptr<Body>& explicitly:
for(const shared_ptr<Body>& b : *scene->bodies){
   if(!b) continue;                      // skip deleted bodies, nullptr-check
   /* do something here */
}
Warning
The previously used macro FOREACH is now deprecated.
Note a few important things:
Always use
const shared_ptr<Body>&(const reference); that avoids incrementing and decrementing the reference count on eachshared_ptr.Take care to skip NULL bodies (
if(!b) continue): deleted bodies are deallocated from the container, but since body id’s must be persistent, their place is simply held by an emptyshared_ptr<Body>()object, which is implicitly convertible tofalse.
In python, the BodyContainer wrapper also has iteration capabilities; for convenience (which is different from the c++ iterator), NULL bodies as silently skipped:
Yade [54]: O.bodies.append([Body(),Body(),Body()])
Out[54]: [0, 1, 2]

Yade [55]: O.bodies.erase(1)
Out[55]: True

Yade [56]: [b.id for b in O.bodies]
Out[56]: [0, 2]
In loops parallelized using OpenMP, the loop must traverse integer interval (rather than using iterators):
const long size=(long)bodies.size();       // store this value, since it doesn't change during the loop
#pragma omp parallel for
for(long _id=0; _id<size; _id++){
   const shared_ptr<Body>& b(bodies[_id]);
   if(!b) continue;
   /* … */
}
InteractionContainer
Interactions are stored in special container, and each interaction must be uniquely identified by pair of ids (id1,id2).
O(1) access to elements,
linear-addressability (0…n indexability),
store
shared_ptr, not objects themselves,mutual exclusion for insertion/removal,
easy iteration over all interactions,
addressing symmetry, i.e. interaction(id1,id2)≡interaction(id2,id1)
Note
As with BodyContainer, there is “abstract” class InteractionContainer, and then its concrete implementations. Currently, only InteractionVecMap implementation is used and all the other were removed. Therefore, the abstract InteractionContainer class may disappear in the future, to avoid unnecessary virtual calls.
Further, there is a blueprint for storing interactions inside bodies, as that would give extra advantage of quickly getting all interactions of one particular body (currently, this necessitates loop over all interactions); in that case, InteractionContainer would disappear.
Insert/erase
Creating new interactions and deleting them is delicate topic, since many eleents of simulation must be synchronized; the exact workflow is described in Handling interactions. You will almost certainly never need to insert/delete an interaction manually from the container; if you do, consider designing your code differently.
// both insertion and erase are internally protected by a mutex,
// and can be done from parallel sections safely
scene->interactions->insert(shared_ptr<Interaction>(new Interactions(id1,id2)));
scene->interactions->erase(id1,id2);
Iteration
As with BodyContainer, iteration over interactions should use the for(const auto& …… : …… ) C++ syntax, also const shared_ptr<Interaction>& can be used instead of auto&:
for(const shared_ptr<Interaction>& i : *scene->interactions){
   if(!i->isReal()) continue;
   /* … */
}
Warning
The previously used macro FOREACH is now deprecated.
Again, note the usage const reference for i. The check if(!i->isReal()) filters away interactions that exist only potentially, i.e. there is only Bound overlap of the two bodies, but not (yet) overlap of bodies themselves. The i->isReal() function is equivalent to i->geom && i->phys. Details are again explained in Handling interactions.
In some cases, such as OpenMP-loops requiring integral index (OpenMP >= 3.0 allows parallelization using random-access iterator as well), you need to iterate over interaction indices instead:
int nIntr=(int)scene->interactions->size(); // hoist container size
#pragma omp parallel for
for(int j=0; j<nIntr; j++){
   const shared_ptr<Interaction>& i=(*scene->interactions)[j];
   if(!i->isReal()) continue;
   /* … */
}
ForceContainer
ForceContainer holds “generalized forces”, i.e. forces, torques, (explicit) dispalcements and rotations for each body.
During each computation step, there are typically 3 phases pertaining to forces:
Resetting forces to zero (usually done by the ForceResetter engine)
Incrementing forces from parallel sections (solving interactions – from LawFunctor)
Reading absolute force values sequentially for each body: forces applied from different interactions are summed together to give overall force applied on that body (NewtonIntegrator, but also various other engine that read forces)
This scenario leads to special design, which allows fast parallel write access:
each thread has its own storage (zeroed upon request), and only writes to its own storage; this avoids concurrency issues. Each thread identifies itself by the omp_get_thread_num() function provided by the OpenMP runtime.
before reading absolute values, the container must be synchronized, i.e. values from all threads are summed up and stored separately. This is a relatively slow operation and we provide ForceContainer::syncCount that you might check to find cummulative number of synchronizations and compare it against number of steps. Ideally, ForceContainer is only synchronized once at each step.
the container is resized whenever an element outside the current range is read/written to (the read returns zero in that case); this avoids the necessity of tracking number of bodies, but also is potential danger (such as
scene->forces.getForce(1000000000), which will probably exhaust your RAM). Unlike c++, Python does check given id against number of bodies.
// resetting forces (inside ForceResetter)
scene->forces.reset()

// in a parallel section
scene->forces.addForce(id,force); // add force

// container is not synced after we wrote to it, sync before reading
scene->forces.sync();
const Vector3r& f=scene->forces.getForce(id);
Synchronization is handled automatically if values are read from python:
Yade [57]: O.bodies.append(Body())
Out[57]: 3
Yade [58]: O.forces.addF(0,Vector3(1,2,3))
Yade [59]: O.forces.f(0)
Out[59]: Vector3(1,2,3)
Yade [60]: O.forces.f(100)
[0;31m---------------------------------------------------------------------------[0m
[0;31mIndexError[0m Traceback (most recent call last)
Cell [0;32mIn[60], line 1[0m
[0;32m----> 1[0m [43mO[49m[38;5;241;43m.[39;49m[43mforces[49m[38;5;241;43m.[39;49m[43mf[49m[43m([49m[38;5;241;43m100[39;49m[43m)[49m
[0;31mIndexError[0m: Body id out of range.
Handling interactions
Creating and removing interactions is a rather delicate topic and number of components must cooperate so that the whole behaves as expected.
Terminologically, we distinguish
- potential interactions,
having neither geometry nor physics. Interaction.isReal can be used to query the status (
Interaction::isReal()in c++).- real interactions,
having both geometry and physics. Below, we shall discuss the possibility of interactions that only have geometry but no physics.
During each step in the simulation, the following operations are performed on interactions in a typical simulation:
Collider creates potential interactions based on spatial proximity. Not all pairs of bodies are susceptible of entering interaction; the decision is done in Collider::mayCollide:
clumps may not enter interactions (only their members can)
clump members may not interact if they belong to the same clump
bitwise AND on both bodies’ masks must be non-zero (i.e. there must be at least one bit set in common)
Collider erases interactions that were requested for being erased (see below).
InteractionLoop (via IGeomDispatcher) calls appropriate IGeomFunctor based on Shape combination of both bodies, if such functor exists. For real interactions, the functor updates associated IGeom. For potential interactions, the functor returns
falseif there is no geometrical overlap, and the interaction will stillremain potential-only
trueif there is geometrical overlap; the functor will have created an IGeom in such case.
Note
For real interactions, the functor must return
true, even if there is no more spatial overlap between bodies. If you wish to delete an interaction without geometrical overlap, you have to do this in the LawFunctor.This behavior is deliberate, since different laws have different requirements, though ideally using relatively small number of generally useful geometry functors.
Note
If there is no functor suitable to handle given combination of shapes, the interaction will be left in potential state, without raising any error.
For real interactions (already existing or just created in last step), InteractionLoop (via IPhysDispatcher) calls appropriate IPhysFunctor based on Material combination of both bodies. The functor must update (or create, if it doesn’t exist yet) associated IPhys instance. It is an error if no suitable functor is found, and an exception will be thrown.
For real interactions, InteractionLoop (via LawDispatcher) calls appropriate LawFunctor based on combination of IGeom and IPhys of the interaction. Again, it is an error if no functor capable of handling it is found.
LawDispatcher takes care of erasing those interactions that are no longer active (such as if bodies get too far apart for non-cohesive laws; or in case of complete damage for damage models). This is triggered by the LawFunctor returning false. For this reason it is of upmost importance for the LawFunctor to return consistently.
Such interaction will not be deleted immediately, but will be reset to potential state. At the next execution of the collider InteractionContainer::conditionalyEraseNonReal will be called, which will completely erase interactions only if the bounding boxes ceased to overlap; the rest will be kept in potential state.
Creating interactions explicitly
Interactions may still be created explicitly with utils.createInteraction, without any spatial requirements. This function searches current engines for dispatchers and uses them. IGeomFunctor is called with the force parameter, obliging it to return true even if there is no spatial overlap.
Associating Material and State types
Some models keep extra state information in the Body.state object, therefore requiring strict association of a Material with a certain State (for instance, CpmMat is associated to CpmState and this combination is supposed by engines such as CpmStateUpdater).
If a Material has such a requirement, it must override 2 virtual methods:
Material.newAssocState, which returns a new State object of the corresponding type. The default implementation returns State itself.
Material.stateTypeOk, which checks whether a given State object is of the corresponding type (this check is run at the beginning of the simulation for all particles).
In c++, the code looks like this (for CpmMat):
class CpmMat: public FrictMat {
   public:
      virtual shared_ptr<State> newAssocState() const { return shared_ptr<State>(new CpmState); }
      virtual bool stateTypeOk(State* s) const { return (bool)dynamic_cast<CpmState*>(s); }
   /* ... */
};
This allows one to construct Body objects from functions such as utils.sphere only by knowing the requires Material type, enforcing the expectation of the model implementor.
Runtime structure
Startup sequence
Yade’s main program is python script in core/main/main.py.in; the build system replaces a few ${variables} in that file before copying it to its install location. It does the following:
Process command-line options, set environment variables based on those options.
Import main yade module (
import yade), residing in py/__init__.py.in. This module locates plugins (recursive search for fileslib*.soin thelibinstallation directory). yade.boot module is used to setup temporary directory, … and, most importantly, loads plugins.Manage further actions, such as running scripts given at command line, opening qt.Controller (if desired), launching the
ipythonprompt.
Singletons
There are several “global variables” that are always accessible from c++ code; properly speaking, they are Singletons, classes of which exactly one instance always exists. The interest is to have some general functionality acessible from anywhere in the code, without the necessity of passing pointers to such objects everywhere. The instance is created at startup and can be always retrieved (as non-const reference) using the instance() static method (e.g. Omega::instance().getScene()).
There are 3 singletons:
ClassFactoryRegisters classes from plugins and able to factor instance of a class given its name as string (the class must derive from
Factorable). Not exposed to python.OmegaAccess to simulation(s); deserves separate section due to its importance.
LoggingHandles logging filters for all named loggers, see logging verbosity.
Omega
The Omega class handles all simulation-related functionality: loading/saving, running, pausing.
In python, the wrapper class to the singleton is instantiated [6] as global variable O. For convenience, Omega is used as proxy for scene’s attribute: although multiple Scene objects may be instantiated in c++, it is always the current scene that Omega represents.
The correspondence of data is literal: Omega.materials corresponds to Scene::materials of the current scene; likewise for materials, bodies, interactions, tags, cell, engines, initializers, miscParams.
To give an overview of (some) variables:
Python |
c++ |
|---|---|
|
|
|
|
|
|
|
|
|
Omega in c++ contains pointer to the current scene (Omega::scene, retrieved by Omega::instance().getScene()). Using Omega.switchScene, it is possible to swap this pointer with Omega::sceneAnother, a completely independent simulation. This can be useful for example (and this motivated this functionality) if while constructing simulation, another simulation has to be run to dynamically generate (i.e. by running simulation) packing of spheres.
Footnotes
Engine loop
Running simulation consists in looping over Engines and calling them in sequence. This loop is defined in Scene::moveToNextTimeStep function in core/Scene.cpp. Before the loop starts, O.initializers are called; they are only run once. The engine loop does the following in each iteration over O.engines:
set
Engine::scenepointer to point to the currentScene.Call
Engine::isActivated(); if it returnsfalse, the engine is skipped.Call
Engine::action()If O.timingEnabled, increment Engine::execTime by the difference from the last time reading (either after the previous engine was run, or immediately before the loop started, if this engine comes first). Increment Engine::execCount by 1.
After engines are processed, virtual time is incremented by timestep and iteration number is incremented by 1.
Background execution
The engine loop is (normally) executed in background thread (handled by SimulationFlow class), leaving foreground thread free to manage user interaction or running python script. The background thread is managed by O.run() and O.pause() commands. Foreground thread can be blocked until the loop finishes using O.wait().
Single iteration can be run without spawning additional thread using O.step().
Python framework
Wrapping c++ classes
Each class deriving from Serializable is automatically exposed to python, with access to its (registered) attributes. This is achieved via YADE_CLASS_BASE_DOC_* macro family. All classes registered in class factory are default-constructed in Omega::buildDynlibDatabase. Then, each serializable class calls Serializable::pyRegisterClass virtual method, which injects the class wrapper into (initially empty) yade.wrapper module. pyRegisterClass is defined by YADE_CLASS_BASE_DOC and knows about class, base class, docstring, attributes, which subsequently all appear in boost::python class definition.
Wrapped classes define special constructor taking keyword arguments corresponding to class attributes; therefore, it is the same to write:
Yade [61]: f1=ForceEngine()

Yade [62]: f1.ids=[0,4,5]

Yade [63]: f1.force=Vector3(0,-1,-2)
and
Yade [64]: f2=ForceEngine(ids=[0,4,5],force=Vector3(0,-1,-2))

Yade [65]: print(f1.dict())
{'force': Vector3(0,-1,-2), 'ids': [0, 4, 5], 'dead': False, 'ompThreads': -1, 'label': ''}

Yade [66]: print(f2.dict())
{'force': Vector3(0,-1,-2), 'ids': [0, 4, 5], 'dead': False, 'ompThreads': -1, 'label': ''}
Wrapped classes also inherit from Serializable several special virtual methods: dict() returning all registered class attributes as dictionary (shown above), clone() returning copy of instance (by copying attribute values), updateAttrs() and updateExistingAttrs() assigning attributes from given dictionary (the former thrown for unknown attribute, the latter doesn’t). And pyDictCustom() explained also in preceeding section.
Read-only property name wraps c++ method getClassName() returning class name as string. (Since c++ class and the wrapper class always have the same name, getting python type using __class__ and its property __name__ will give the same value).
Yade [67]: s=Sphere()

Yade [68]: s.__class__.__name__
Out[68]: 'Sphere'
Subclassing c++ types in python
In some (rare) cases, it can be useful to derive new class from wrapped c++ type in pure python. This is done in the yade.pack module module: Predicate is c++ base class; from this class, several c++ classes are derived (such as inGtsSurface), but also python classes (such as the trivial inSpace predicate). inSpace derives from python class Predicate; it is, however, not direct wrapper of the c++ Predicate class, since virtual methods would not work.
boost::python provides special boost::python::wrapper template for such cases, where each overridable virtual method has to be declared explicitly, requesting python override of that method, if present. See Overridable virtual functions for more details.
When python code is called from C++, the calling thread must hold the python “Global Interpreter Lock” (GIL). When initalizing the script as well as running one iteration calling O.step(), the running thread is the same as python, and no additional code is required. On the other hand, calling python code inside the simulation loop using O.run() needs the lock to be acquired by the thread, or a segfault error will occurs. See implementation of pyGenericPotential () for a complete exemple.
Reference counting
Python internally uses reference counting on all its objects, which is not visible to casual user. It has to be handled explicitly if using pure Python/C API with Py_INCREF and similar functions.
boost::python used in Yade fortunately handles reference counting internally. Additionally, it automatically integrates reference counting for shared_ptr and python objects, if class A is wrapped as boost::python::class_<A,shared_ptr<A>>. Since all Yade classes wrapped using YADE_CLASS_BASE_DOC_* macro family are wrapped in this way, returning shared_ptr<…> objects from is the preferred way of passing objects from c++ to python.
Returning shared_ptr is much more efficient, since only one pointer is returned and reference count internally incremented. Modifying the object from python will modify the (same) object in c++ and vice versa. It also makes sure that the c++ object will not be deleted as long as it is used somewhere in python, preventing (important) source of crashes.
Custom converters
When an object is passed from c++ to python or vice versa, then either
the type is basic type which is transparently passed between c++ and python (int, bool, std::string etc)
the type is wrapped by boost::python (such as Yade classes,
Vector3and so on), in which case wrapped object is returned; [7]
Other classes, including template containers such as std::vector must have their custom converters written separately. Some of them are provided in py/wrapper/customConverters.cpp, notably converters between python (homogeneous, i.e. with all elements of the same type) sequences and c++ std::vector of corresponding type; look in that source file to add your own converter or for inspiration.
When an object is crossing c++/python boundary, boost::python’s global “converters registry” is searched for class that can perform conversion between corresponding c++ and python types. The “converters registry” is common for the whole program instance: there is no need to register converters in each script (by importing _customConverters, for instance), as that is done by yade at startup already.
Note
Custom converters only work for value that are passed by value to python (not “by reference”): some attributes defined using YADE_CLASS_BASE_DOC_* macro family are passed by value, but if you define your own, make sure that you read and understand Why is my automatic to-python conversion not being found?.
In short, the default for def_readwrite and def_readonly is to return references to underlying c++ objects, which avoids performing conversion on them. For that reason, return value policy must be set to return_by_value explicitly, using slighly more complicated add_property syntax, as explained at the page referenced.
This deficiency is addressed presently in the file lib/serialization/PyClassCustom.hpp for the .def_readonly(…) function. It can be improved later if the need arises.
Adding a new python/C++ module
Modules are placed in py/ directory, the C++ parts of the modules begin their name with an underscore _. The procedure to add a new module is following:
Create your new files:
Update the module redirection map in these two places:
modsin doc/sphinx/yadeSphinx.py.moduleMapin doc/sphinx/conf.py, if the new module has aC++part (this duplication of data will hopefully be soon removed).
Add the
C++file intopy/CMakeLists.txtlike this.Modify the
CMakeLists.txtbut only if the file will depend on cmake compilation variables, eg. like this. The file then needs an additional extension.inand be put in two places:
Hint
The last step regarding yourNewModule.py.in (or _yourNewModule.cpp.in) is needed only on very rare occasions, and is included here only for the sake of completeness.
Debugging boundary between python and C++
During normal use all C++ exceptions are propagated back to python interface with full information associated with them. The only situation where this might not be the case is during execution of command import module inside a python script. It might happen that when importing a new module some cryptic errors occur like: initialization of module raised unreported exception. These unreported exceptions happen in the situation when the C++ code executed a python code inside it (this is called embedding) and this python code threw an exception. The proper way to deal with this situation is to wrap entire module declaration inside a try {} catch(...) {} block. It might be possible to deal with specific exceptions also (see here for other example catch blocks), however the general solution is to properly inform python that importing this module did not work. In this catch block it is possible to execute PyErr_Print(); command to see what the problem was and propagate the exception back to python, however during import module command only the SystemError python exception can get through. Hence the catch(...) block after BOOST_PYTHON_MODULE(_yourNewModule) should look like this:
#include <lib/base/Logging.hpp>

CREATE_CPP_LOCAL_LOGGER("_yourNewModule.cpp");

BOOST_PYTHON_MODULE(_yourNewModule)
try {
        py::def("foo", foo, R"""(
The description of function foo().

:param arg1: description of first argument
:param arg2: description of second argument
:type arg1: type description
:type arg2: type description
:return: return description
:rtype: the return type description

Example usage of foo:

.. ipython::

   In [1]: from yade.yourNewModule import *

   In [1]: foo()

.. note:: Notes, hints and warnings about how to use foo().

        )""");

} catch (...) {
        LOG_FATAL("Importing this module caused an exception and this module is in an inconsistent state now.");
        PyErr_Print();
        PyErr_SetString(PyExc_SystemError, __FILE__);
        boost::python::handle_exception();
        throw;
}
Note
Pay attention to the _yourNewModule inside BOOST_PYTHON_MODULE(…), it has to match the file name of the .cpp file.
Further reading, about how to work with python exceptions:
Maintaining compatibility
In Yade development, we identified compatibility to be very strong desire of users. Compatibility concerns python scripts, not simulations saved in XML or old c++ code.
Renaming class
Script scripts/rename-class.py should be used to rename class in c++ code. It takes 2 parameters (old name and new name) and must be run from top-level source directory:
$ scripts/rename-class.py OldClassName NewClassName
Replaced 4 occurences, moved 0 files and 0 directories
Update python scripts (if wanted) by running: perl -pi -e 's/\bOldClassName\b/NewClassName/g' `ls **/*.py |grep -v py/system.py`
This has the following effects:
If file or directory has basename
OldClassName(plus extension), it will be renamed usingbzr.All occurences of whole word
OldClassNamewill be replaced byNewClassNamein c++ sources.An entry is added to py/system.py, which contains map of deprecated class names. At yade startup, proxy class with
OldClassNamewill be created, which issues aDeprecationWarningwhen being instantiated, informing you of the new name you should use; it creates an instance ofNewClassName, hence not disruting your script’s functioning:Yade [3]: SimpleViscoelasticMat() /usr/local/lib/yade-trunk/py/yade/__init__.py:1: DeprecationWarning: Class `SimpleViscoelasticMat' was renamed to (or replaced by) `ViscElMat', update your code! (you can run 'yade --update script.py' to do that automatically) -> [3]: <ViscElMat instance at 0x2d06770>
As you have just been informed, you can run yade --update to all old names with their new names in scripts you provide:
$ yade-trunk --update script1.py some/where/script2.py
This gives you enough freedom to make your class name descriptive and intuitive.
Renaming class attribute
Renaming class attribute is handled from c++ code. You have the choice of merely warning at accessing old attribute (giving the new name), or of throwing exception in addition, both with provided explanation. See deprec parameter to YADE_CLASS_BASE_DOC_* macro family for details.